Today is my birthday.
I just settled back home from a there-are-no-words-to-accurately-describe-how-stunning-it-was trip to Maui (there are some meager attempts to capture some of it in Stories>Travel and here). I hadn’t thought at all about the trip until the day before we left when I had to pack. 2018 wrapped up with some very stressful and disappointing surprises on top of significant renovations to the house. Then, the night those were all complete, feasts and fun with family and friends began. (https://safeanimalshelter.com/)
Inevitably, I was sick during the holidays, but am grateful I was 98% myself when it was time to throw stuff into a suitcase and go. After a lot of “do I?” “don’t I?”—my computer stayed behind. I’m happy to report: I didn’t miss it once over the course of almost two weeks. But now I’m home, and most of the brittle-beyond-belief Christmas greens are in the kindling basket, I reorganized a few things in the living room, my plants are watered, I got some rest, and today, all I wanted to do was share before-and-after pics of the kitchen reno, maybe bake something sweet, and just be in my home.
We were lucky to score our house this summer. My love and I rented for 2 1/2 years from a couple who drove through our magical town, fell in love with it, bought this old house and renovated it for their retirement dream home. They moved back to Dallas while we were in it to spend time with family and a new grand baby, who they ultimately couldn’t move away from.
For those that have followed this site, you know that I moved from Chicago to an historic town in the eastern panhandle of West Virginia years ago. The homes here are Civil-War-era gems, each with loads of character, history, even some ghosts (there’s actually a campy tv show about the ghosts in this town).
So, the fact that we were able to secure a renovated home from good people who loved it (not a flip job) was a make-it-work kind of moment when they called us with the offer. We’re constantly walking around saying, “I can’t believe we get to live here.”
I’ll be sharing lots of projects as we make it feel like ours like…
• We have a mini house in the back next to a creek/mini waterfall (I know, I know) that we want to turn into an AirBnB/guest house.
• I’ve already planted about 150 bulbs in the yard. I want a wonderland. I’m also obsessed with conifers, Japanese gardens, edible trees, and bushes—all things plants. Who knows how it will all turn out? It’ll be eclectic at least, but I’m definitely a horse at the gate for springtime.
Over the holiday season we updated light fixtures, turned the saddest, coldest room in the house into the space that we hang in the most now (aka “The Parlour,” aka “Cozytown”), and updated the kitchen.
What you can’t see is that a rainbow tear of joy just fell on the keyboard just now… the kitchen!
While the kitchen in this house was nice in its own right, to me, it felt so wrong.
I remember coming into this house the first time to have dinner with our future landlords, heart sinking when we entered the kitchen. See, for a year prior, Mike and I would go for walks through town and we’d craft our route to pass this house as it was being renovated. Creepers? Yes, but harmless, admiring and respecting all of the love being poured into it as we slowed our stroll on by. Look! New windows! New paint! New gutters! Is that a new deck?! We knew it was special. I’d always imagined a simple, modern yet classic, bright kitchen…
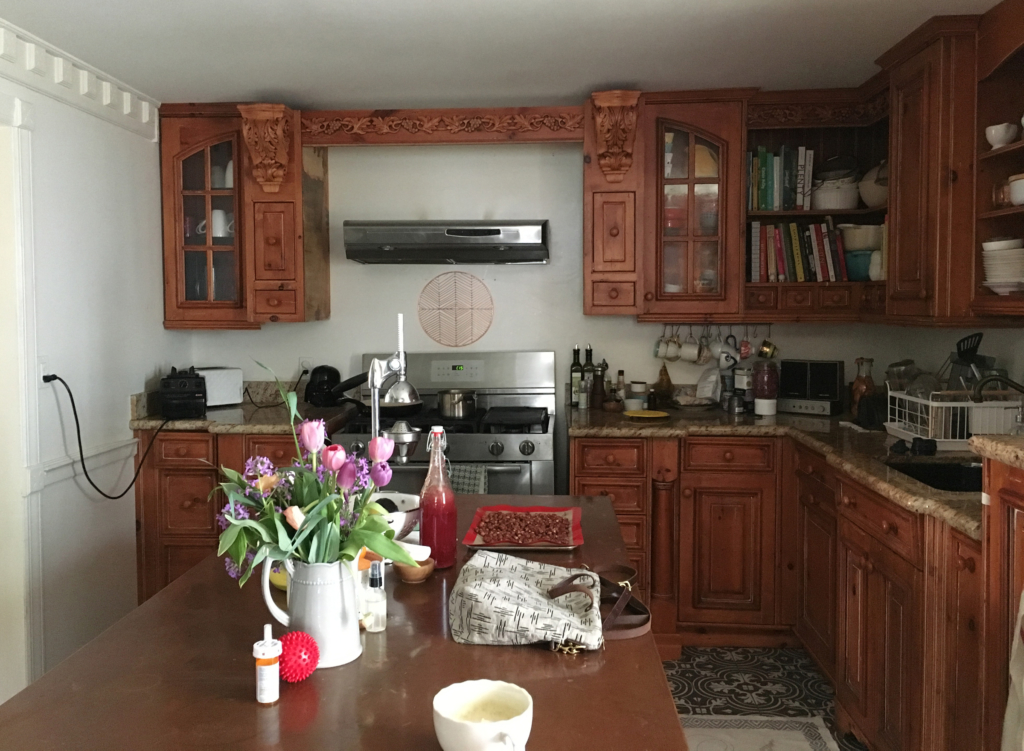
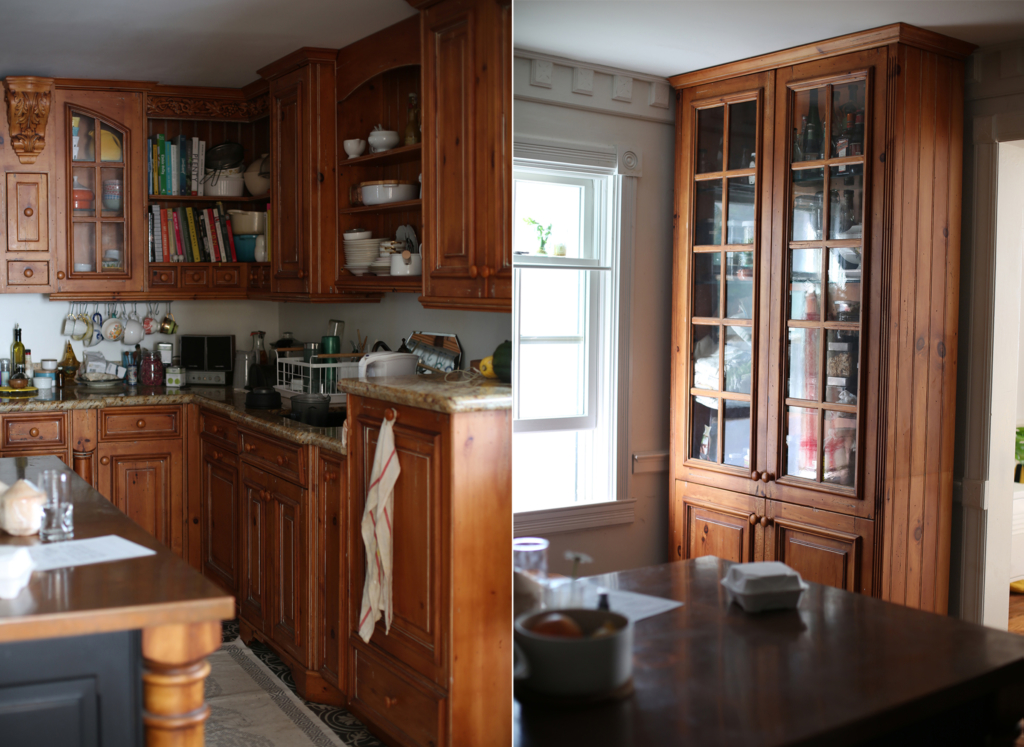
The kitchen space in this house isn’t very large, but the previous owner had fallen in love with an ornate, dark, French-style oak kitchen with a huge coppertop island in Dallas and had it shipped to WV when they renovated.
To me, it was too much kitchen in too little of a space. Too many design elements competing for attention. It would have been able to shine in a large, open space with high ceilings and windows to offset and balance the dark weight of the wood.
Literally every day I walked in there, I felt it. Heavy. Dark. Crammed. It was a lesson in subjectivity. The previous owner adored this kitchen, but I felt suffocated in it. I always apologized for it when people came over, feeling a silly need to explain that “I didn’t do this.” Maybe I was being a baby, but I know that I wasn’t inspired to cook in there (despite all my efforts to make the space feel like me). And it diminished my desire to be creative and make recipes. And it’s my job to be creative and make recipes.
I wrote an entire book avoiding that kitchen (the whole thing is shot in the dining room, the only room as a renter that I was allowed to paint white).
When we closed on the house, I think I may have waited one week (and by “waited” I mean “paint all rooms in the house first”), but then, I borrowed my dear friend’s drill and started taking the upper cabinets down myself. I had daydreamed about it enough, it was time.
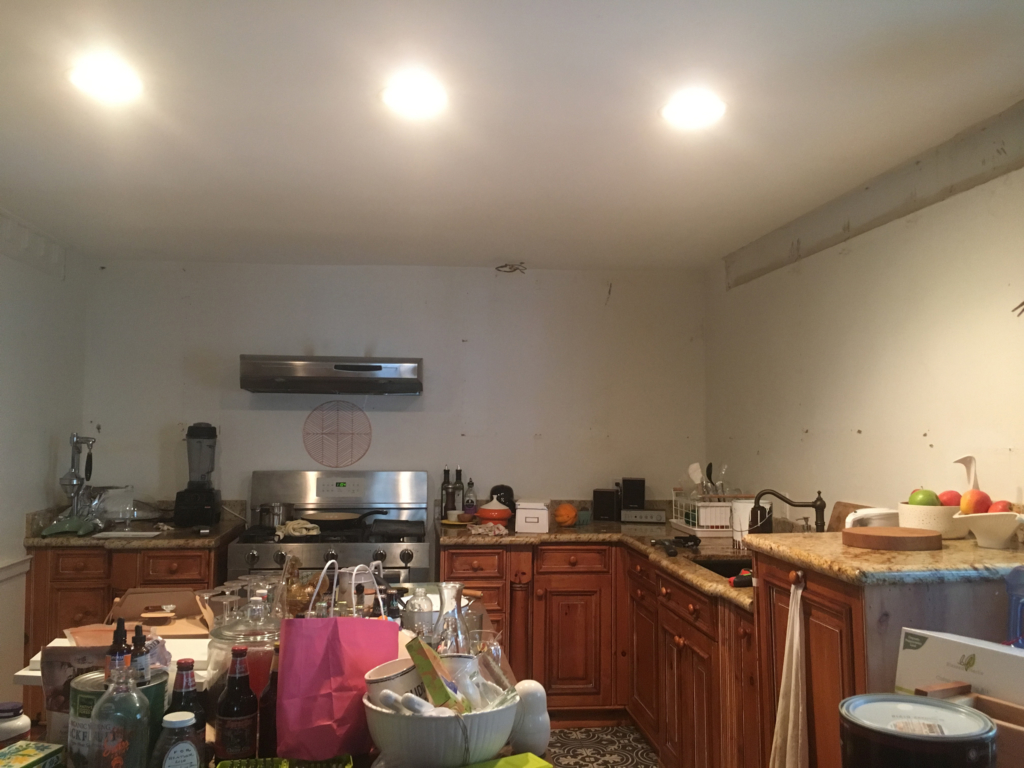
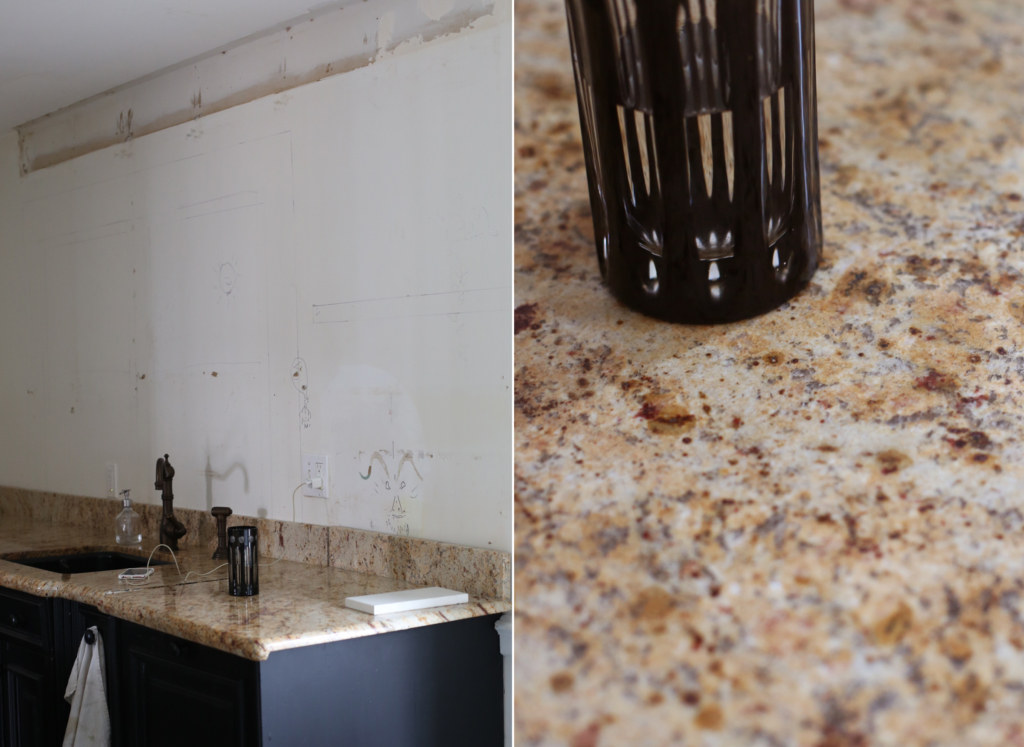
Now, I was so hotpants to make changes that the only “before” shots I really have are from when a friend asked me to take and send some. A few are blurry and most pics are dark because the kitchen was dark (we called it the “Bat Cave”). I actually brightened a few shots so you could actually see the kitchen before.
Let’s start…
We had one little window that tried and tried to cast some natural light into the room, and I put a mirror in vain behind the sink to bounce light from the next room over. Go ahead and laugh at that attempt.
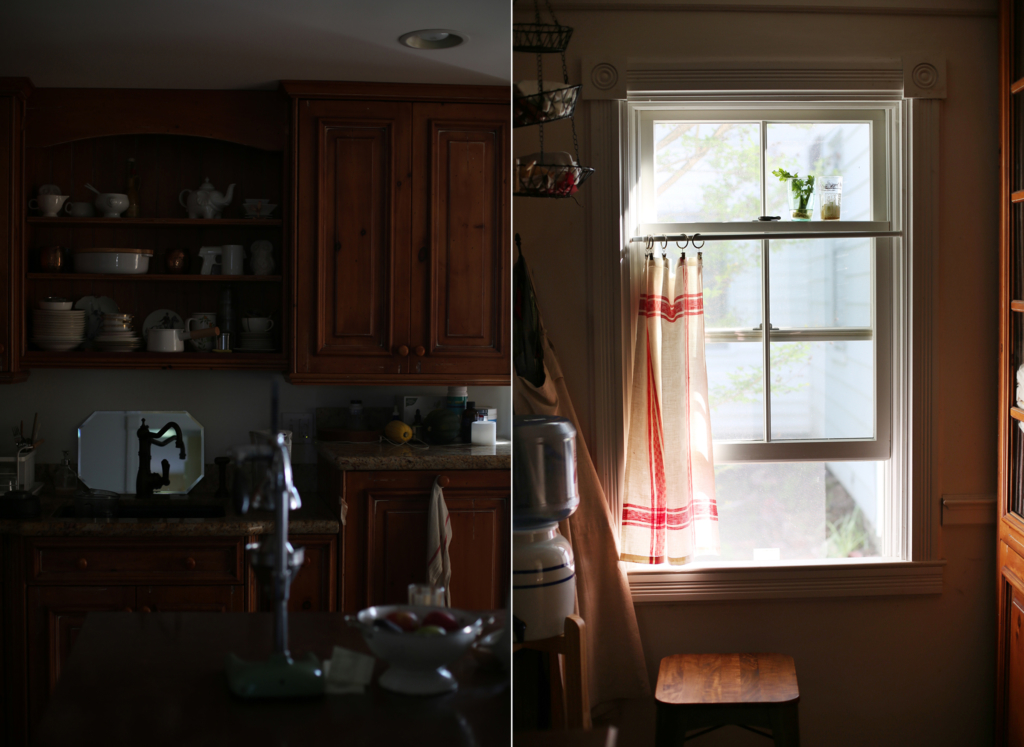
Brightened “before” shots to follow…
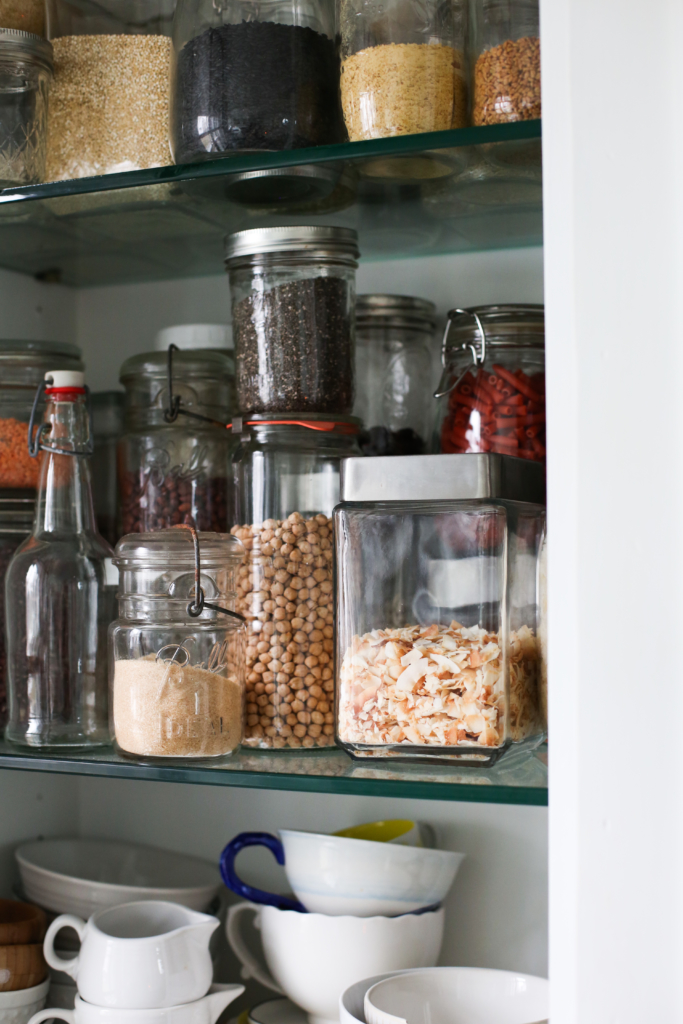
A girl couldn’t have dreamed for more storage—that I had—but one of my quirks is that I like to see what I have, so most of my stuff was on the countertops and half of the cabinets went unused. Spices, tools, ingredients, and fun servingware don’t get used if they’re stuffed back into deep cabinets. You’re not cooking if your tools are hidden/forgotten.
I think I was also trying to distract myself from the grapevines, columns, and fussy elements of the woodwork (impressive work yes, but not the right space for this style) by pulling my stuff out.
This corner below-left was the darkest spot in the room. Good for brewing kombucha, not so good for the soul. I put things that made me happy there, like my fave cookbooks, teas, teacups, festive Dutch ovens, and a vintage amp I could hook my phone up to for tunes.
A few weird decisions that haunted me…
The spaceship-like hood, framed like a thing of beauty with the grapevines and columns, but kinda pathetic in reality. Sad trombone…
This island was so very huge, we were always clipping our hips as we tried to maneuver around it. It was also topped with a stunning copper top (no doubt about that), but it turned any towels you used or anything that came in contact with it, green. Acidic foods also changed the patina, which was encouraged, and kinda cool, but it always looked dirty no matter how much I cleaned it.
Everywhere you turned, even by the only window in the room, there was hulking, dark wood…
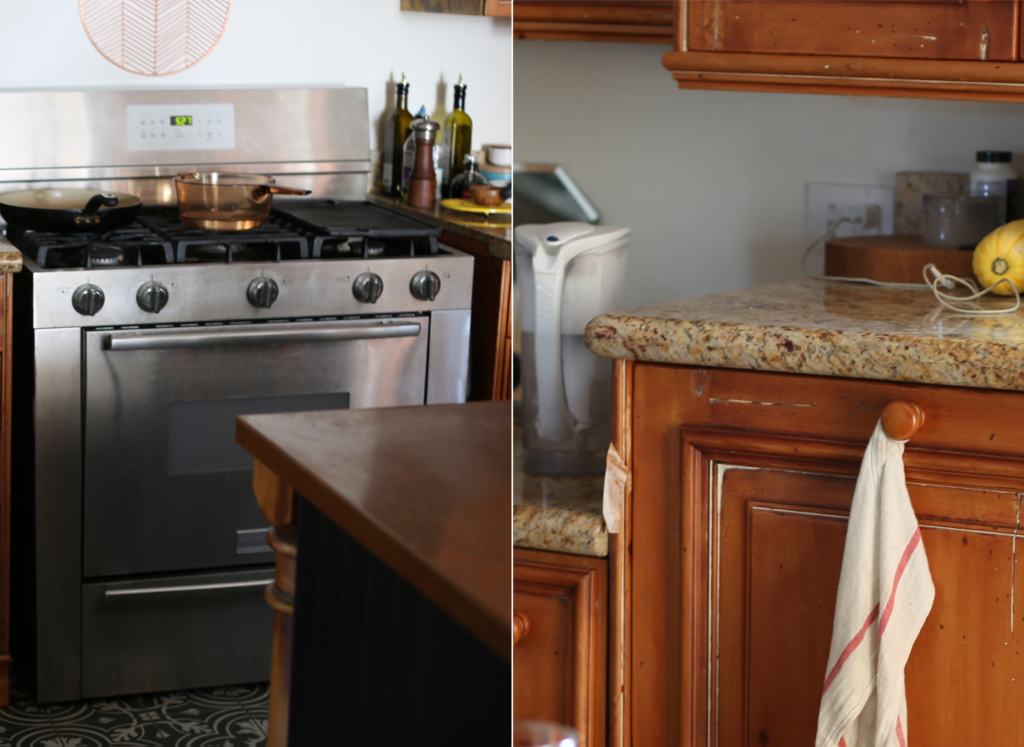
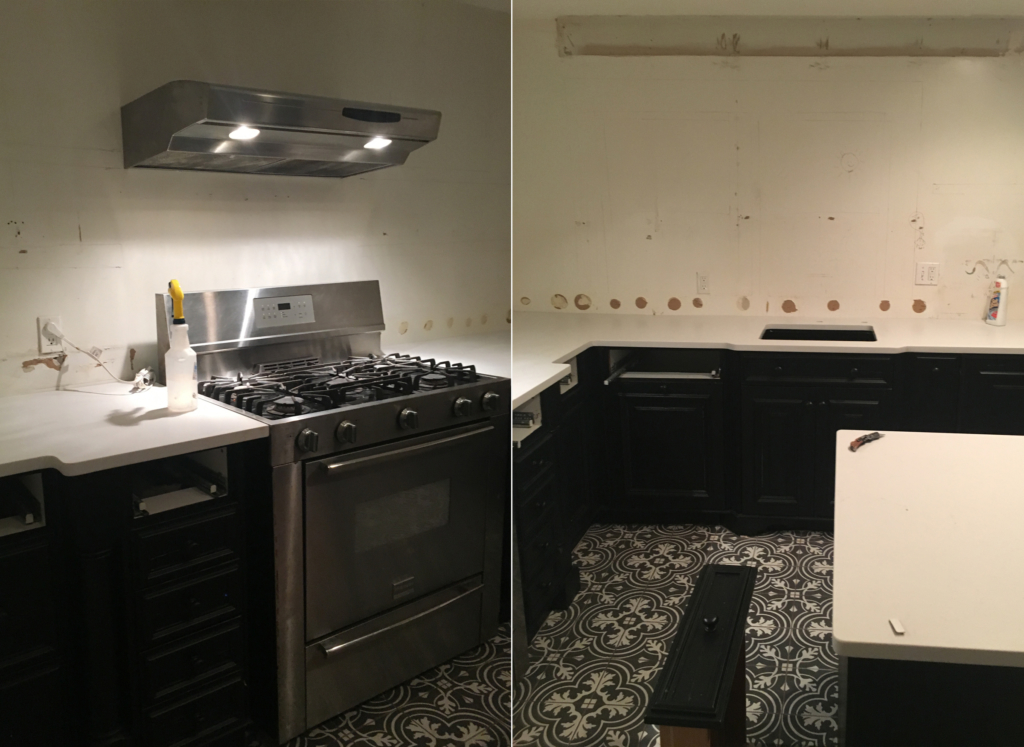
There were two significant no-man’s-land opportunities for food to disappear forever on either side of the range—we love the range though. It stayed.
Also, to accommodate a bottom drawer that we never even knew was there until we started renovating, the dishwasher (bottom right) bumped up from the counter about 9″ bringing the counter almost to the bottom of the cabinets above, making it a pretty unusable surface cooking wise.
Note my white gaffers tape stuck to the left edge of the dishwasher… the top rack inside was never set properly so when you opened the door, it rolled out startling/annoying you every time. The tape would hold it in place while I loaded it.
I didn’t have a significant remodeling plan, just a Pinterest board of what I liked, desire for sweeping change, and confidence in my organic decision-making process. I knew I would paint all of the cabinets white, or the top cabinets white and the bottoms black, but I wanted to see how I felt as I worked…
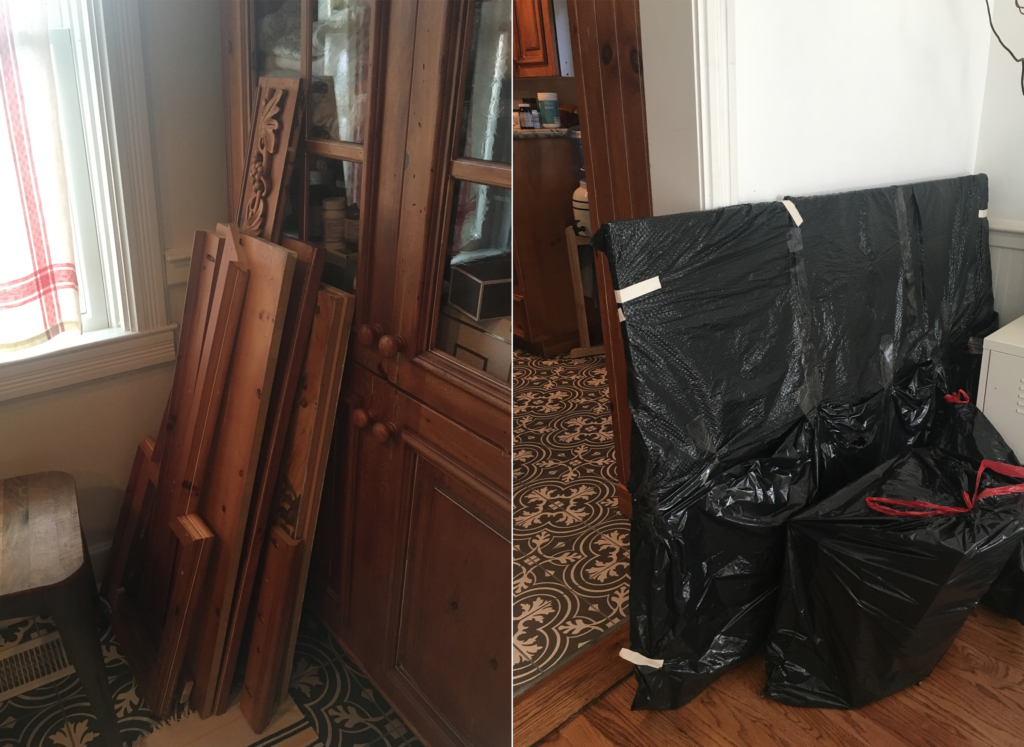
So, the first thing I did was remove all of the “trimmings” below from the cabinets in an effort to simplify the lines. I also prepared the items I had put in the closet the day I moved in to free up space (below-right: a ginormous French country painting, additional apothecary countertop cabinet-boxes, tin decorative tiles, etc.) for a new home (all of the removed cabinets found a good new home, too). These items below-right are not shown in any of the “before” kitchen pics… soooo, use your imagination as to how-on-earth they would have fit in there…
Then I started to take down the elements of the kitchen that felt unnecessary. I did know I wanted a window, likely over the sink.
Once the grapevine woodwork over the range was removed, along with those side cabinets, I noticed that the hood was off center about 1″. Great.
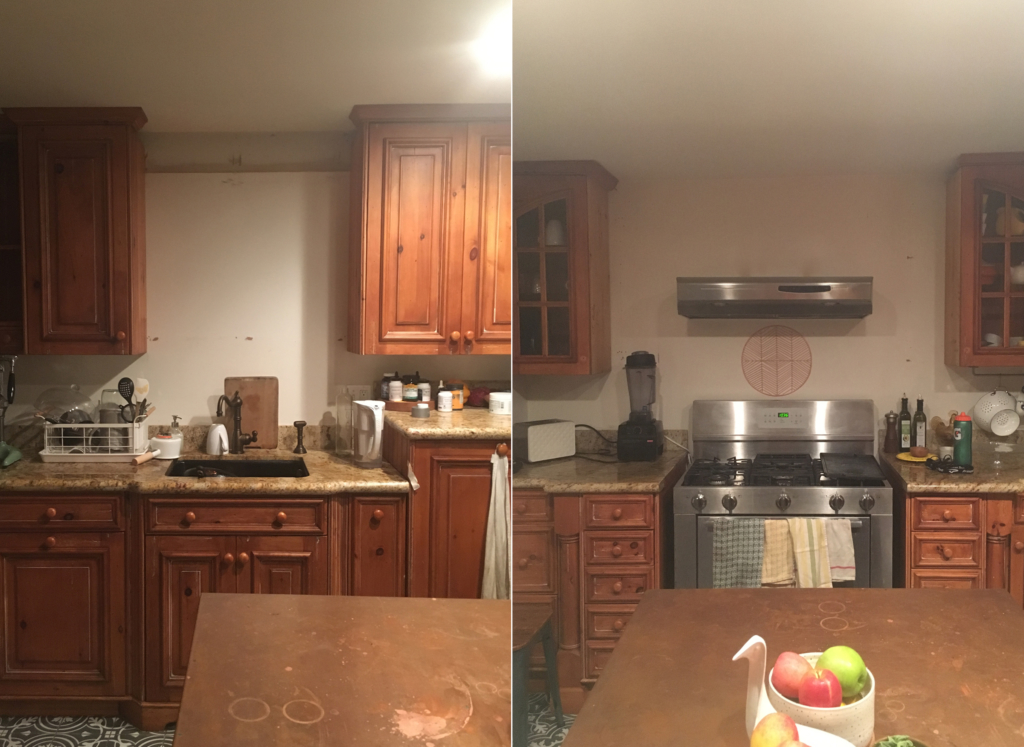
At this point I texted pics to a pal who gave me validation for what I was already thinking/feeling was right: “remove those top cabinets altogether. Things were starting to feel more open and I wanted to keep going.
I have good friends.
I may have even heard some angels singing at this point below…
The cabinets are great functionality wise, they have those lovely slow-spring-closures, all kinds of organizers inside them, and I didn’t want to pay to replace them when they were perfectly fine. So, black paint was my choice—it would make the columns and excessive detail work fall into the background AND it would give the superfun floor a chance to be the hero—no more fighting for attention with the cabinets and other kitchen elements.
I used General Finishes Lamp Black Milk Paint and their High-Performance Flat Top Coat and was amazed—didn’t have to sand or prime a thing, only cleaned the cabinets with water and my homemade vinegar cleaner.
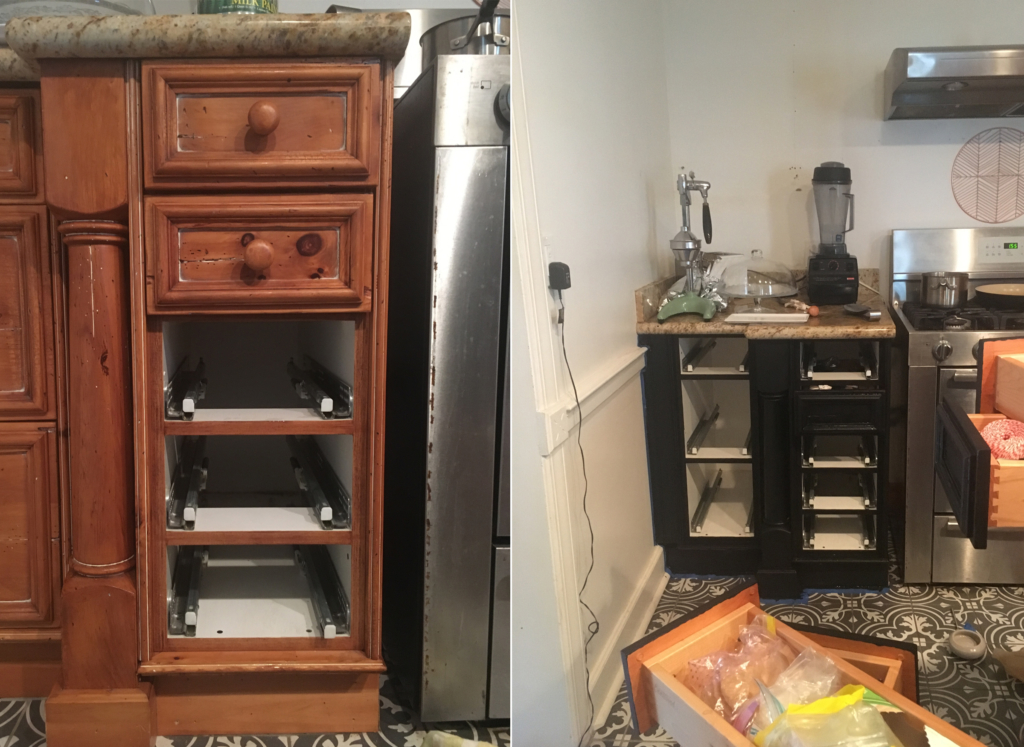
Next up was the island, which I also loved functionality wise. Upon obsessive inspection and daydreaming years prior, I suspected that the four columns on each corner could be removed to create an additional 18″ of space lengthwise without compromising the guts of the thing. I cut the top and scooted it to reveal that this was true!
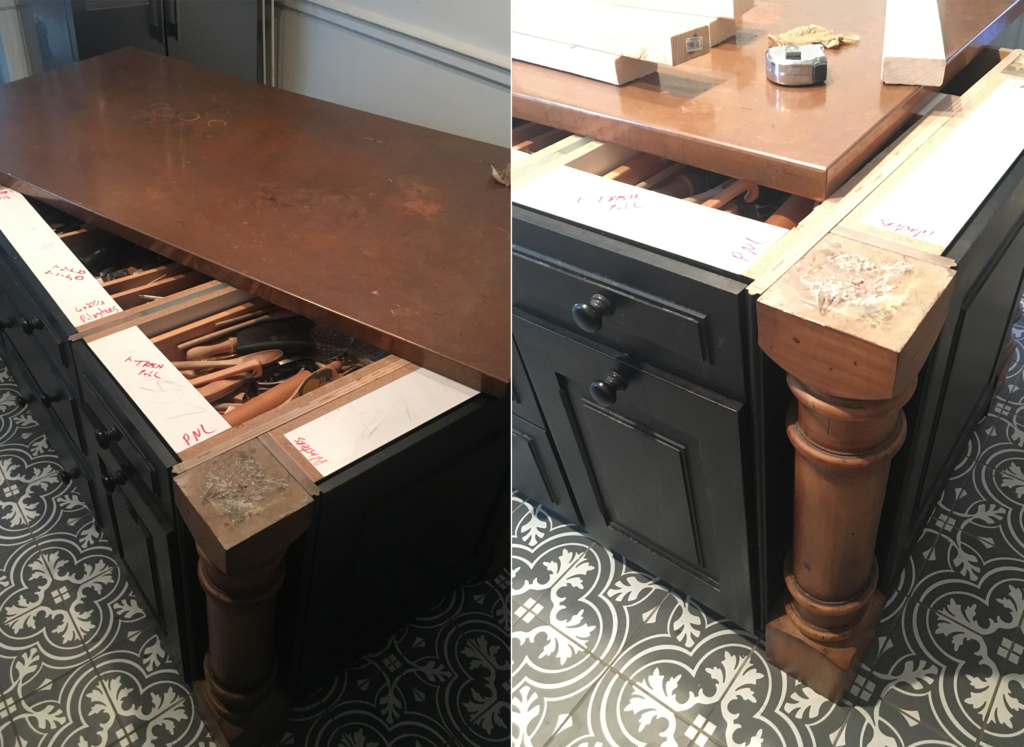
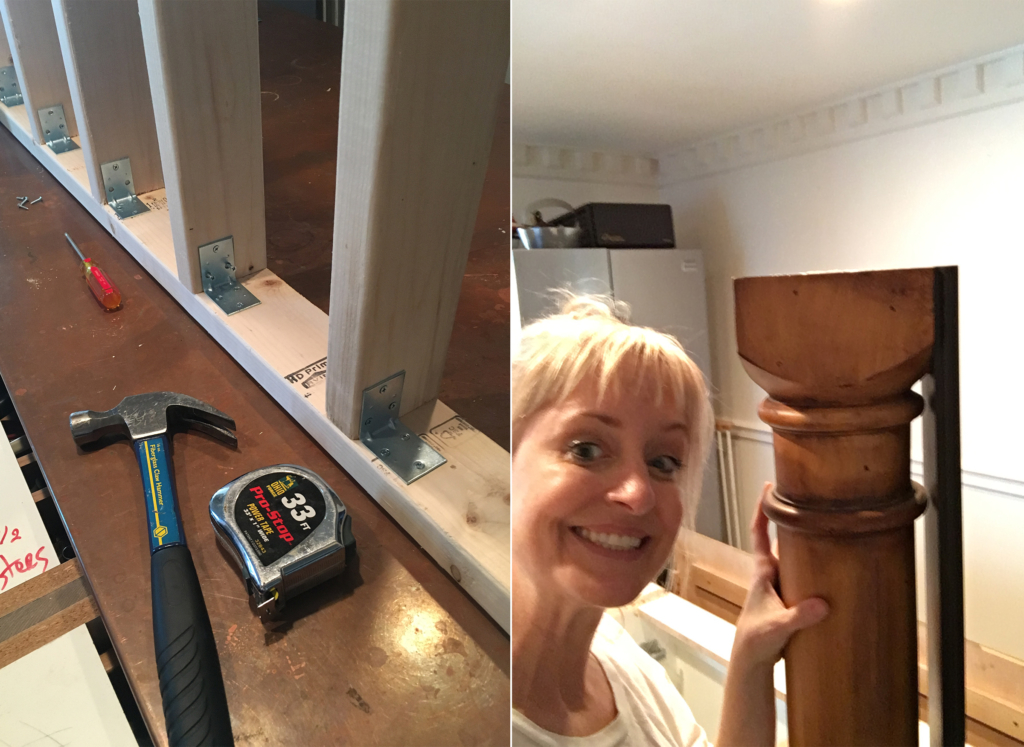
I built a strong base of 2x4s to hold the weight of the island so then I could remove the legs. Seemed simple enough…
The base was easy to build and paint, and relatively easy to get underneath the island, but removing the legs was an 8-hour challenge of hidden screws, impossible glue, and endless chiseling, but I got one leg off (delighted photo sent to a pal below) and only 8 hours later the rest were free. Ha! My eye is twitching now remembering this effort… it was worth it though. Our hips can now move around the kitchen bruise free.
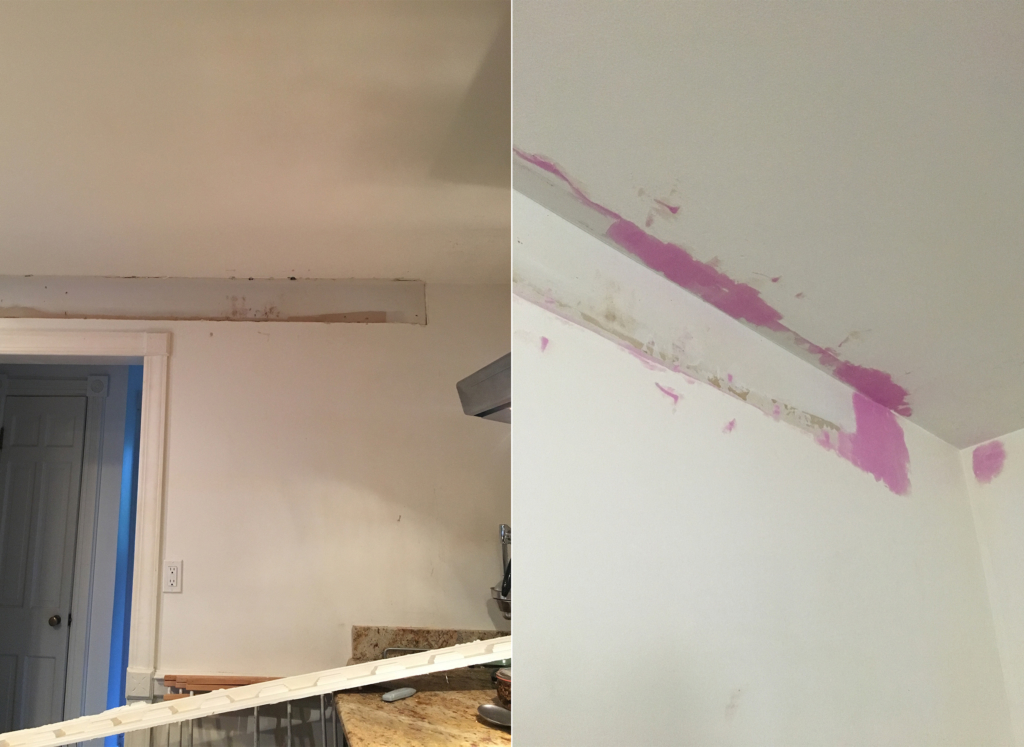
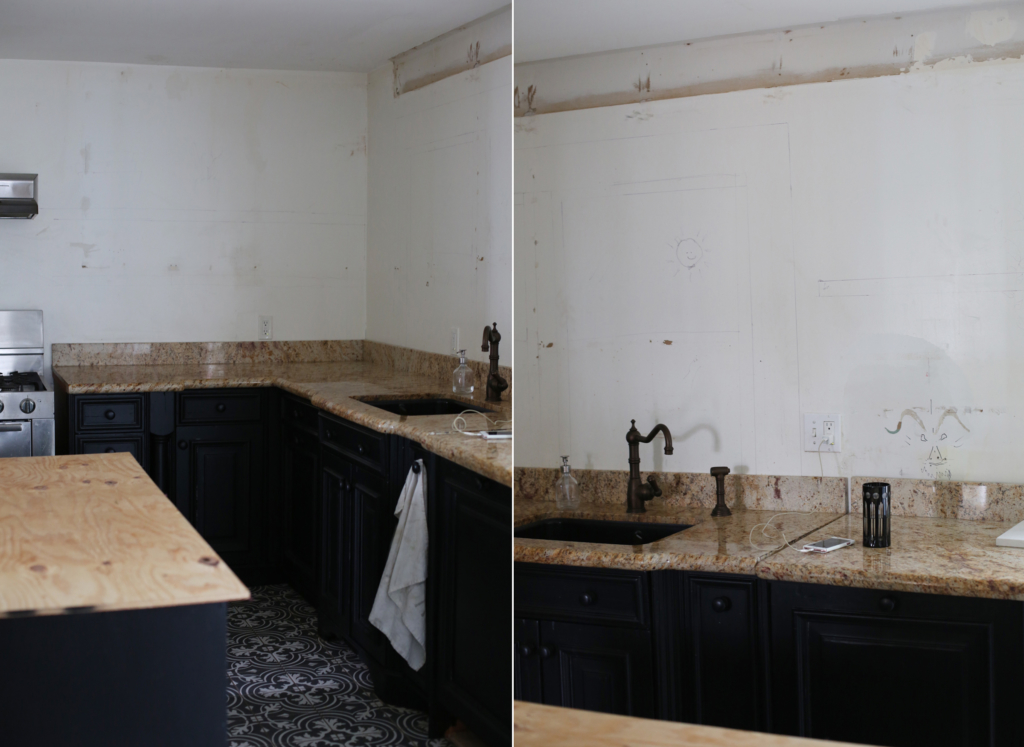
Also, note the trim where the wall meets the ceiling (bottom, right).
This was likely from the original house in one of it’s many lives, but once I removed the cabinets we saw that parts had already been removed to accommodate the oak kitchen (about 60%), so it was best to remove it altogether (we’re saving for another use).
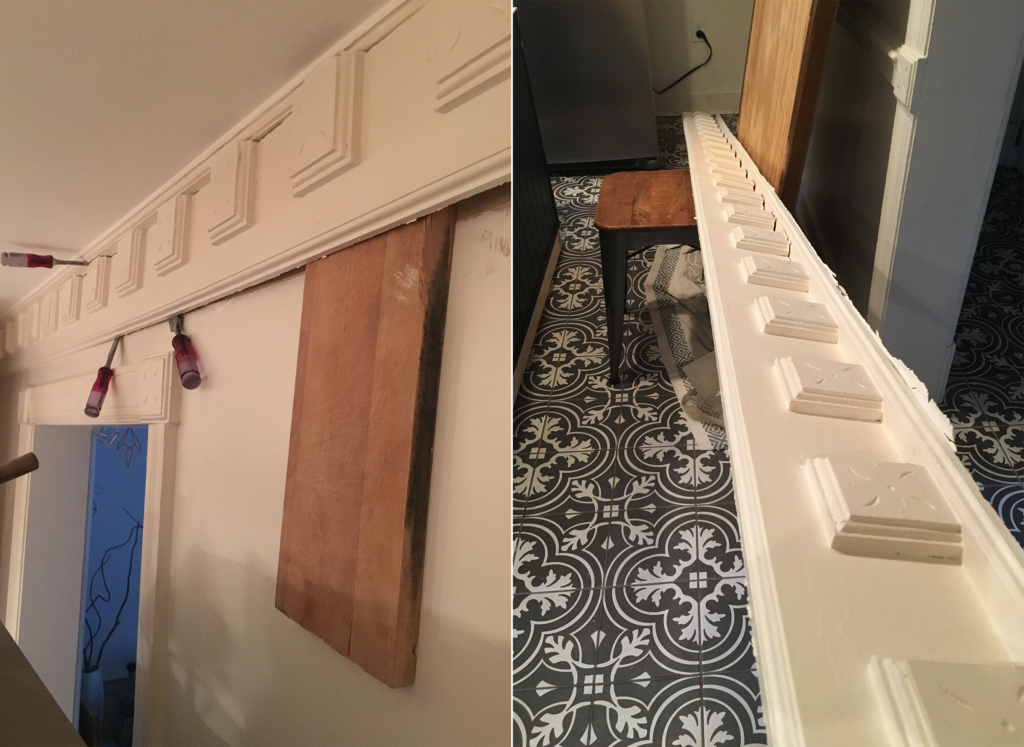
Deciding to remove it? Easy. Actually removing it? Not so much. Lots of chiseling… lots of creative hacks… lots of patching.
Let’s just simply say that that was challenging.
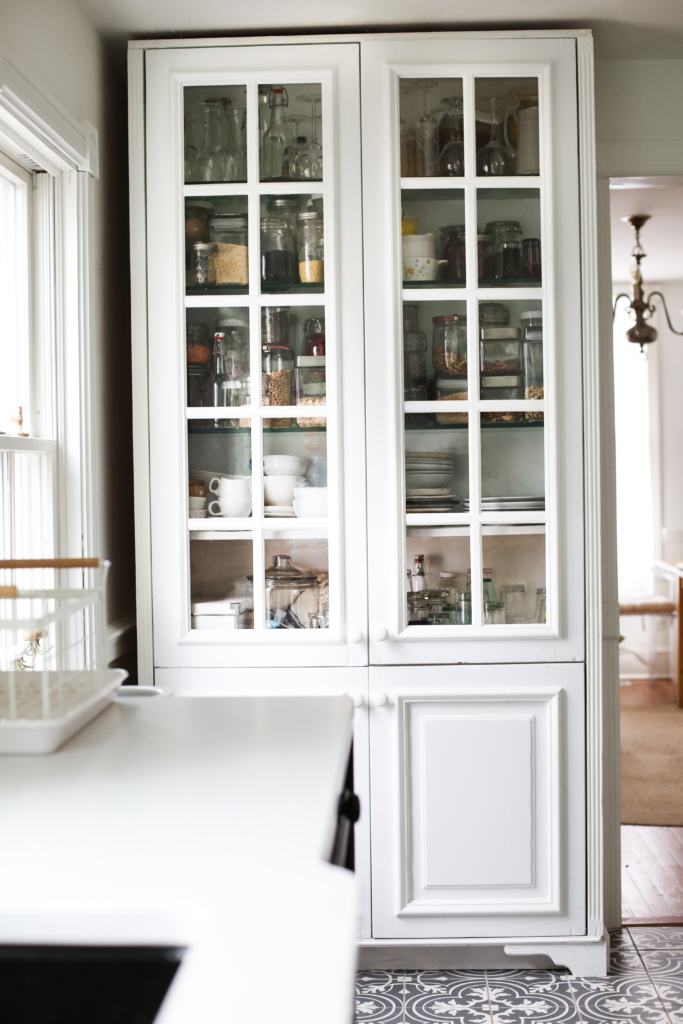
Onto the next! I decided to paint the built-in so it would create a sense of openness and belonging in the space, so… white milk paint did the trick.
Now, I didn’t seal this paint job as it wasn’t until after I hit it with two coats, I read the sealer label that I had used for the black cabinets and it warned against using it on a white paint job due to discoloration. Gah! I was on a mission though, so I did 4 coats of paint to really lock in any leaking of original stain into the paint (which supposedly is a process the sealer could expedite hence the warning). I have extra paint and I don’t mind painting, so I’ll happily give it a fresh coat in time if I find that it needs it. So far so good.
As soon as we closed on the house we were working with the historic commission in town to get approval for the addition of kitchen windows. After upper cabinets were down, I was crazy for sunshine and opted for two instead of one. I won’t go into this process too much as it makes my chest tighten from the stressful memories, but we received approval for windows a few months later and I was able to hustle and find someone great to get them in before the holidays (I had committed to hosting family, a lot of family).
Ideally, windows would go in before counters, but in order to get it all done in time (lots of different schedules to align around the holidays) I had to take a chance and have the counters go in first.
I kept the faith that it would all work out. And, I couldn’t freakin’ wait another minute…
My sweet, sweet brother-in-law helped me make one important move before counters went in: remove the unnecessary drawer under the dishwasher so it could fall inline with the other counters for more working space. He also fixed that top rack so I could open the door without being assaulted by it. Once done, I spent too much time just smiling and pretending to cut things—actually running my hands over the entire area with a jaw-cramping smile on my face. This area was never usable for food prep before. I was thrilled…
We chose Caesarstone’s Frosty Carrina in a honed finish (my beloved sample bottom left on the old counter)—white with minimal marbling to help open up the room and create a simple backdrop to showcase good food. Like the copper top, no matter how I cleaned this old countertop it always felt dirty to me. I had someone say once that it looked like vomit—once you hear that, you can’t un-hear it.
Now, I have a friend that I respect a ton who—how do I put it?—has and despises Caesarstone. This lady knows what she’s talking about, but at the counter shop it was looking good to me quality and price wise. I was thinking about Dekton, but really was drawn to the Caesarstone in a honed finish. I texted her about it and she warned me again: “cans scratch it, carrot juice stains it, it’s a nightmare!”
I then posted a Q in Insta Stories asking what people’s experiences were with this product and everyone raved. So, I was left with loads of raves and one can’t-ignore “avoid it at all costs!” This is when the saleswoman demonstrated some primo customer service. She gave me their sample to take home and told me, “scratch it up, stain it, beat it up, and see how you feel.”
And I did. I took a knife to it, spooned on all the culprits too: carrot juice, chlorophyll, beet juice, oil, tomato juice, and turmeric, then left it to sit and stain for 4 days.
Some people from Instagram also chimed in with their suggested cleaning methods. The wise and wonderful Meghan Telpner (has this counter too) recommended this product for cleaning and I do believe it’s all I’ll ever use again. Yes, the Caesarstone (especially honed and porous) stains (my 4-day test proved that for sure), but Universal Stone cleans it quickly, naturally, and easily. So, I went for it.
What. A. Difference. New. Counters. Make!
The room still needed more natural light, but it was starting to come together…
The cabinets required some insets (unavoidable), but we went with a sleeker, thinner counter, more understated corners, and no bullnose edges like the previous counters. For some reason, we were always breaking dishware and glasses on those corners, like they were eating our things.
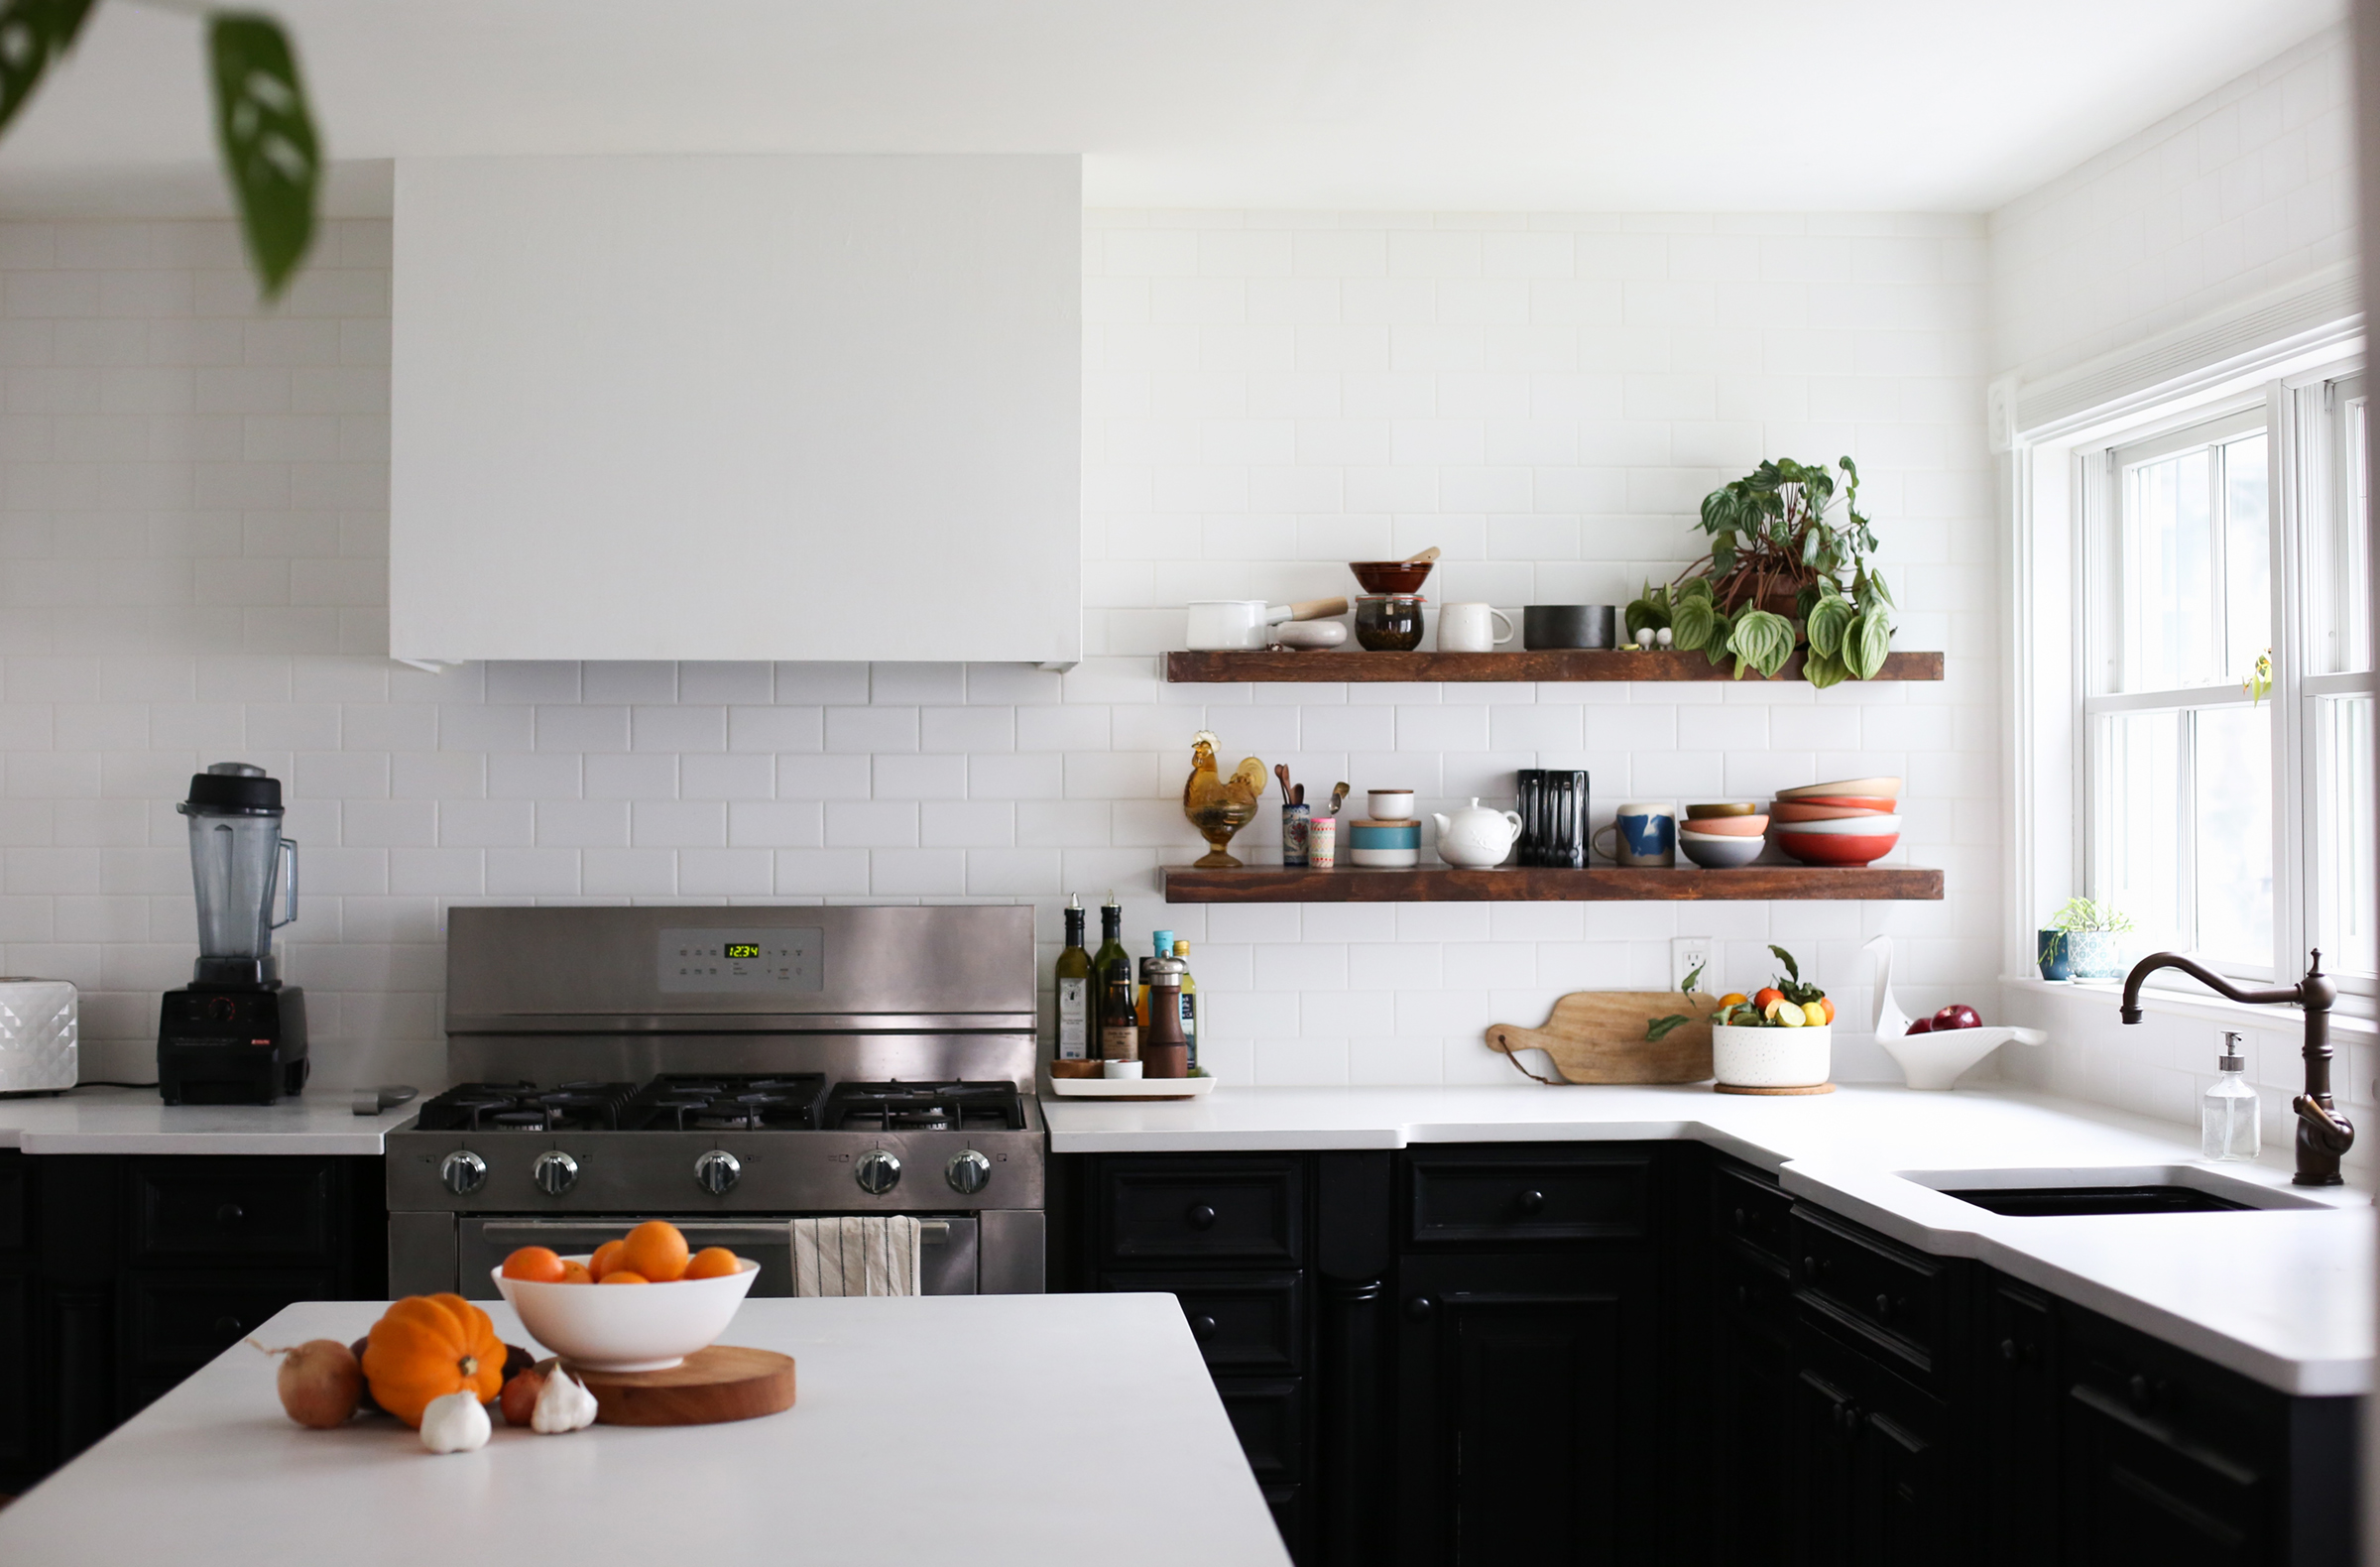
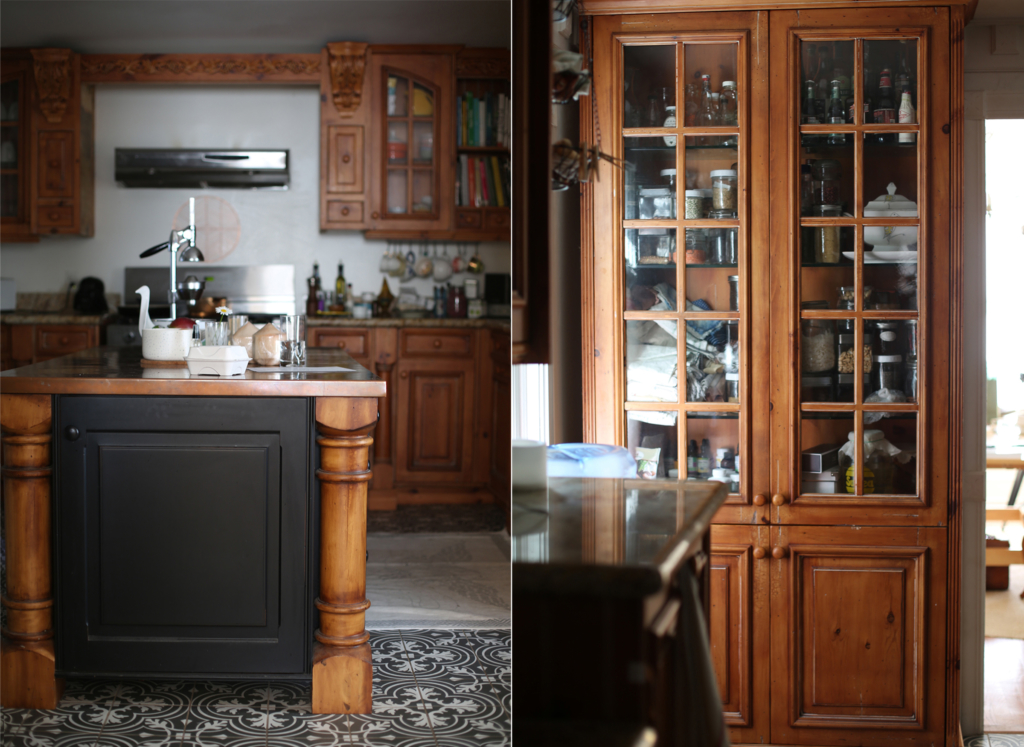
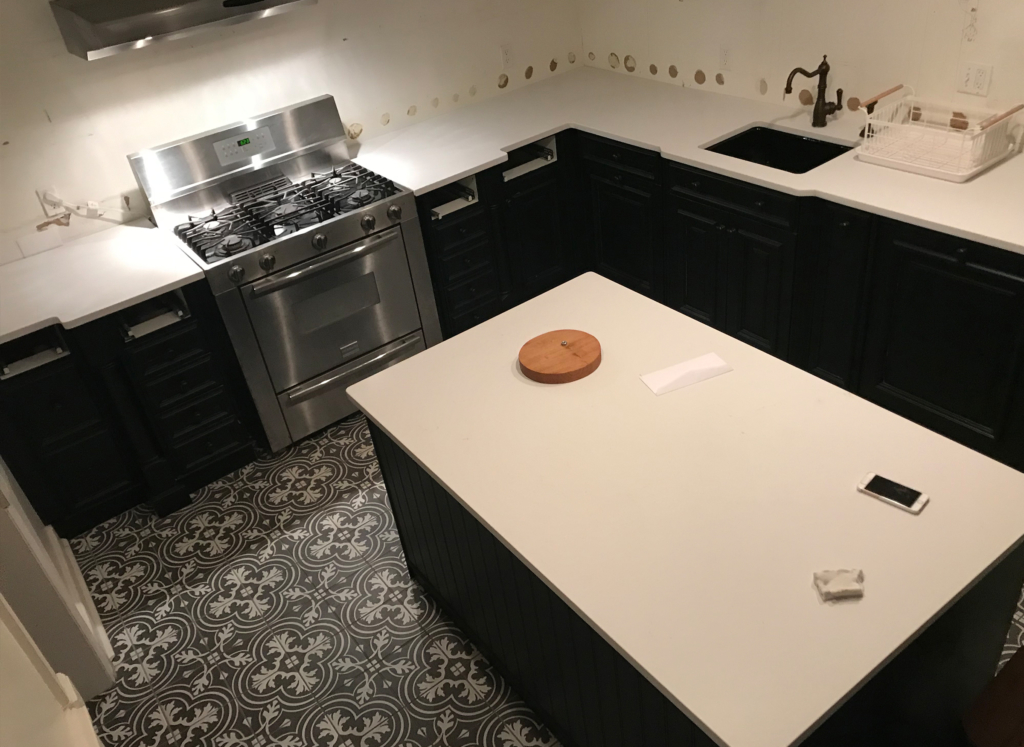
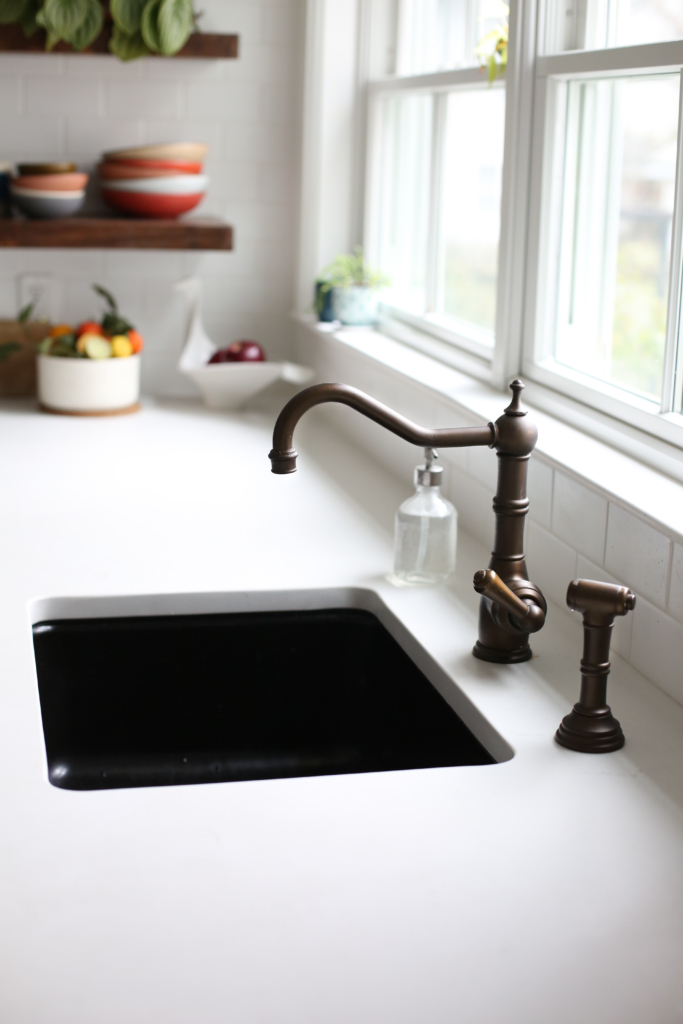
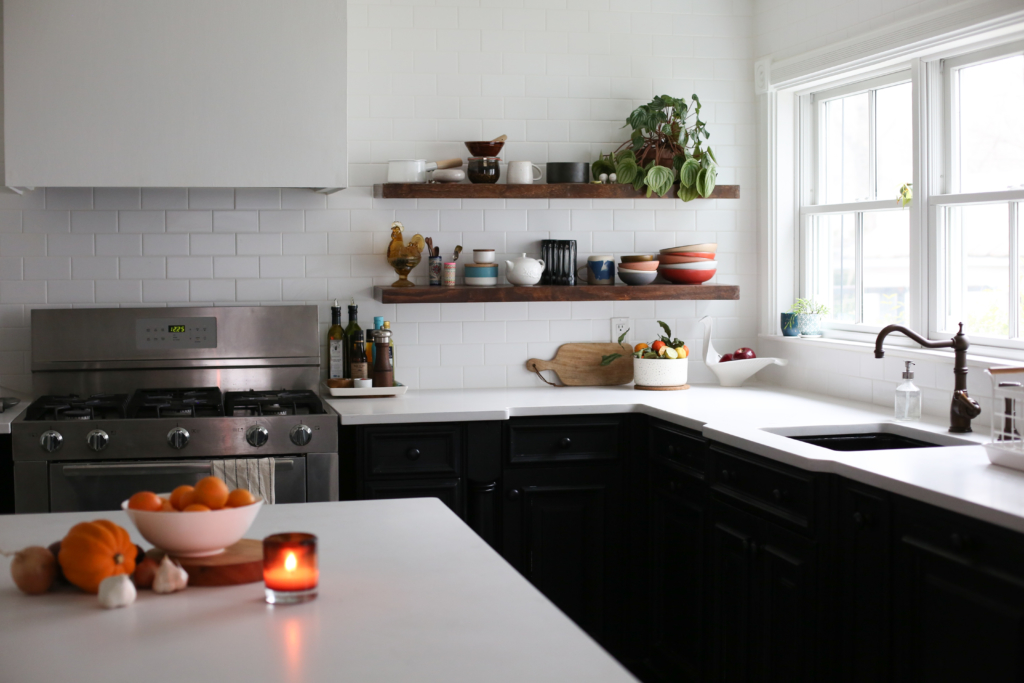
As you can see below, we got rid of no-man’s-land on either side of the range (!!) and decided to keep the cast-iron sink and farmhouse-style faucet and sprayer. They (and the floor) can finally show off their personalities.
Shaving the columns from the island also created a significant amount of dancing-while-cooking room as well.
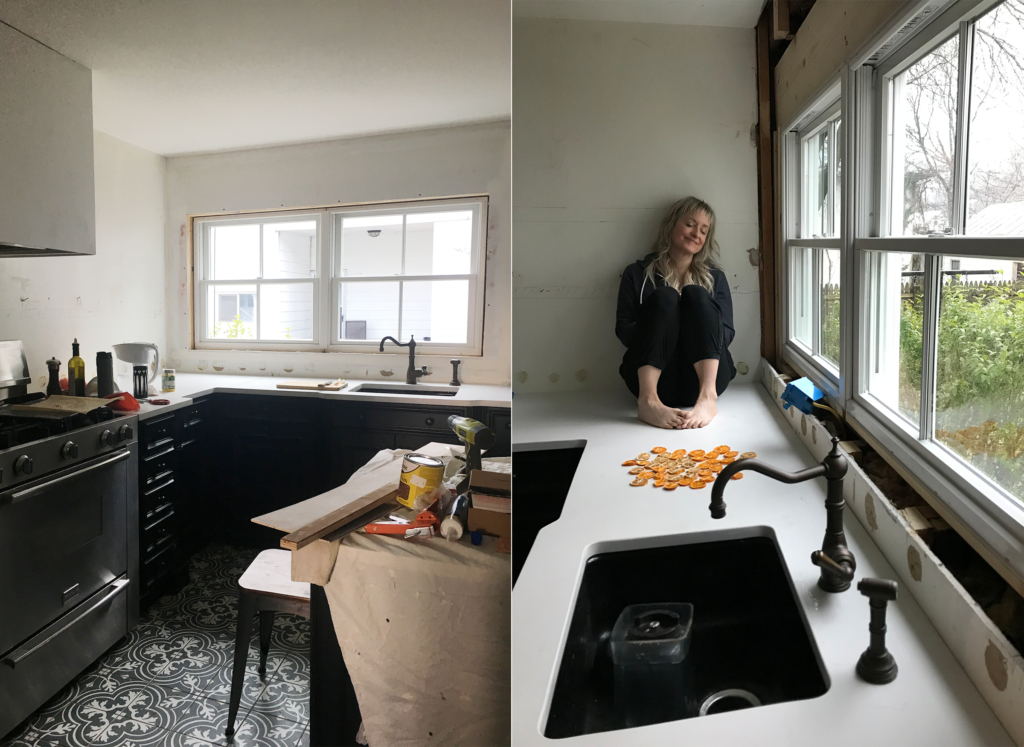
Now, it was time for windows! The guys who put these babies in will always have a special place in my heart. Mike found me like this (bottom right) the very first morning they were partially in. I just stared out of them for about an hour…
This song was the soundtrack for the week.
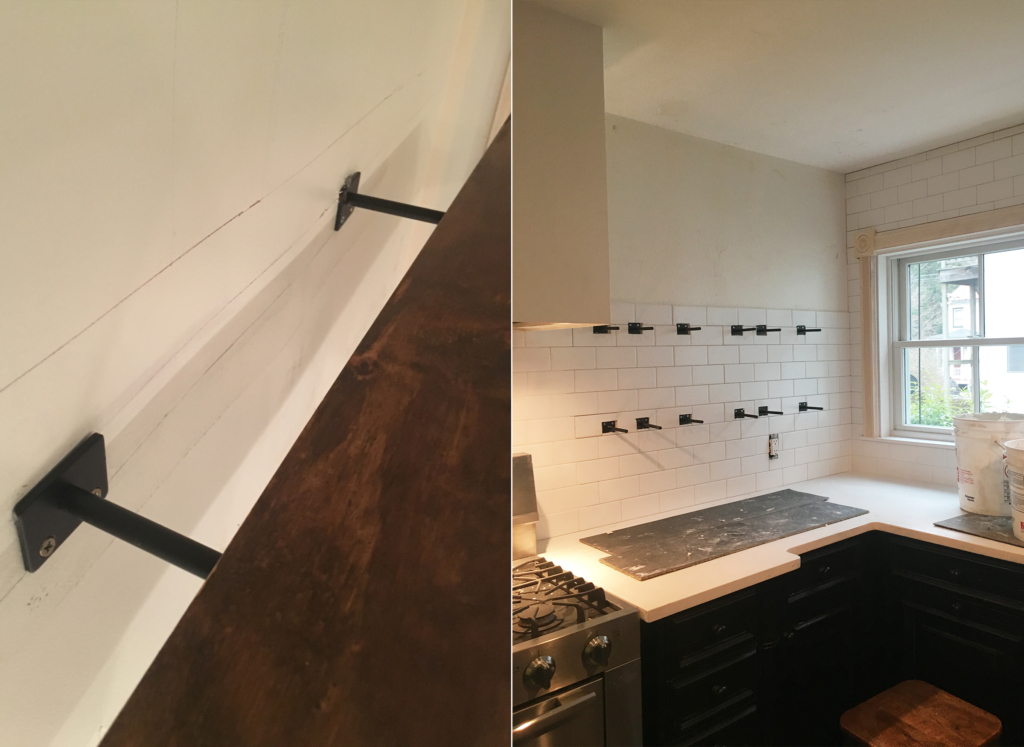
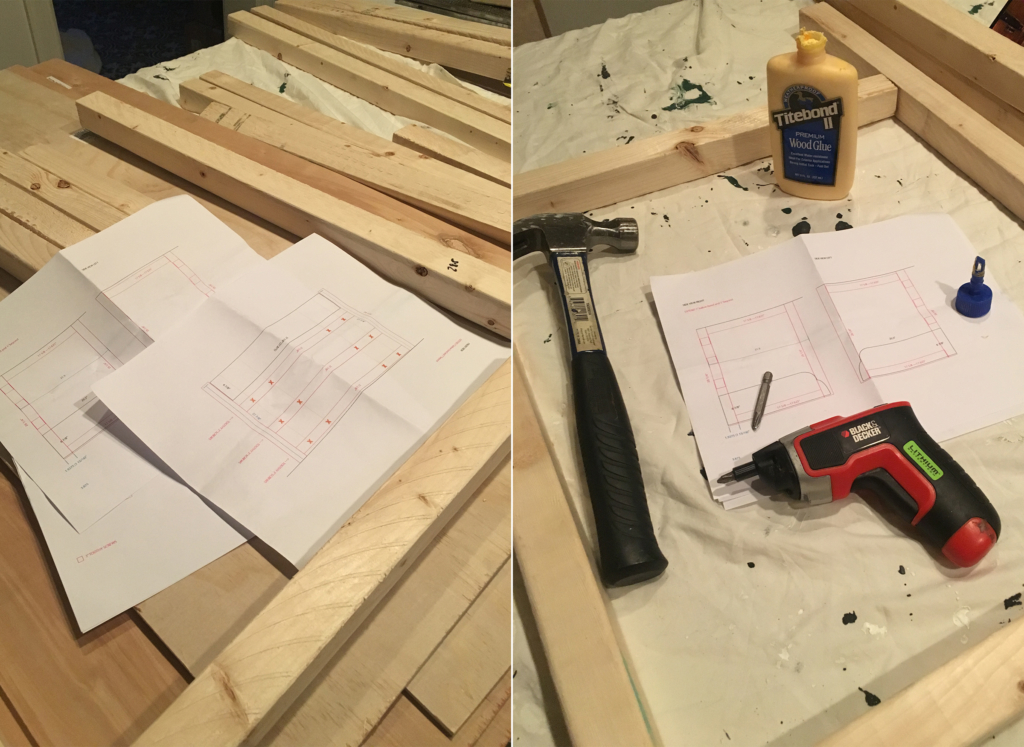
To pull it all together? Classic subway tile. But this is an old house and since I wanted a few floating shelves, I knew that I had to get brackets into the studs first. I didn’t want to try and locate the studs after tiles were in, and I didn’t want any chance of the tiles cracking (whether I used a diamond bit or not). Since I love a challenge, I was under the gun schedule-wise, and I wasn’t tired of pretending that I’m a 7′ tall lumberjack, I decided to make the shelves myself.
I bought some super-strong brackets to build shelves around. Then I scoped out my options at Home Depot for wood, and came home and drew up a plan.
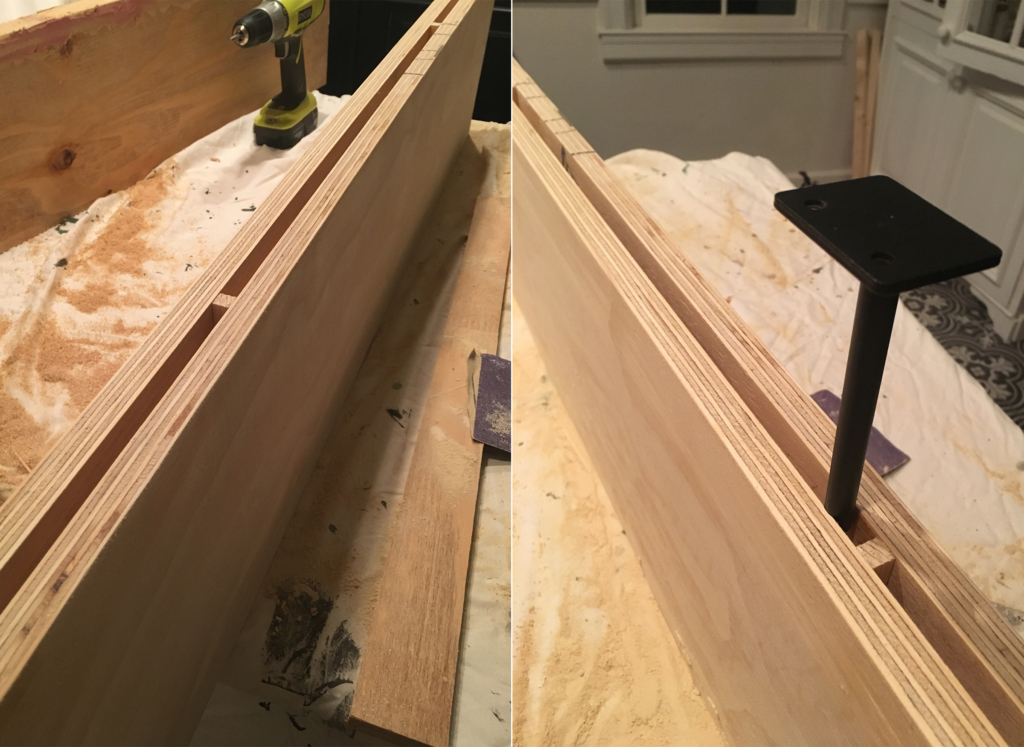
By making the backside tight on the brackets, I could get them to hold without fail once brackets were in the studs. I patched and sanded any cracks (with wood glue and putty) and the countersunk screws that held them together…
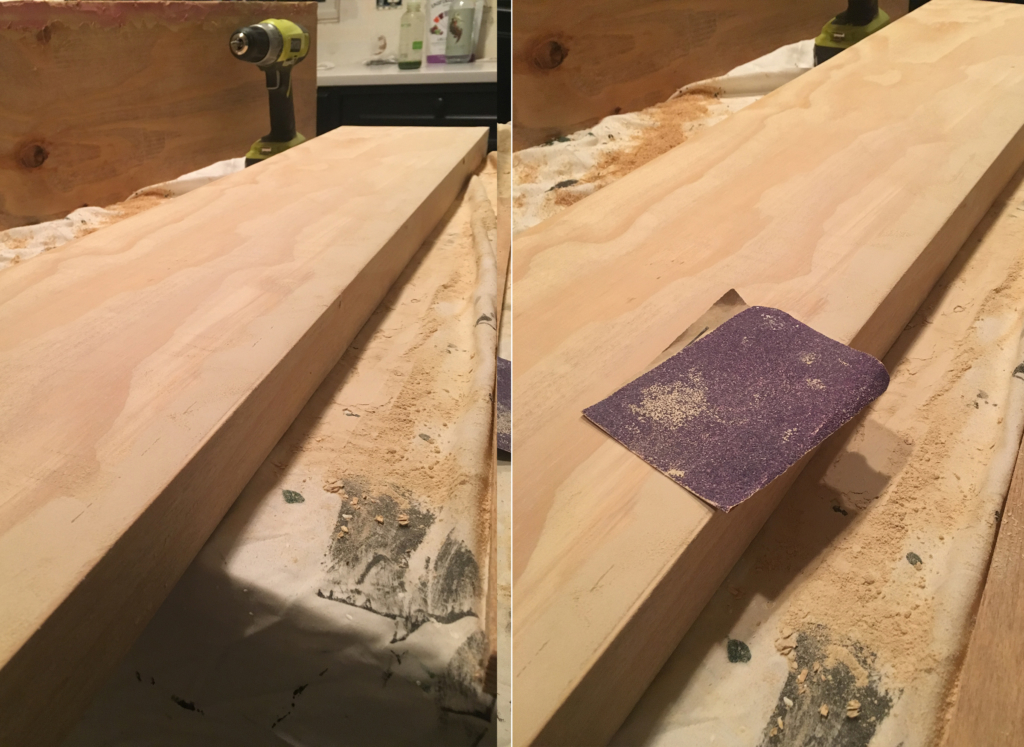
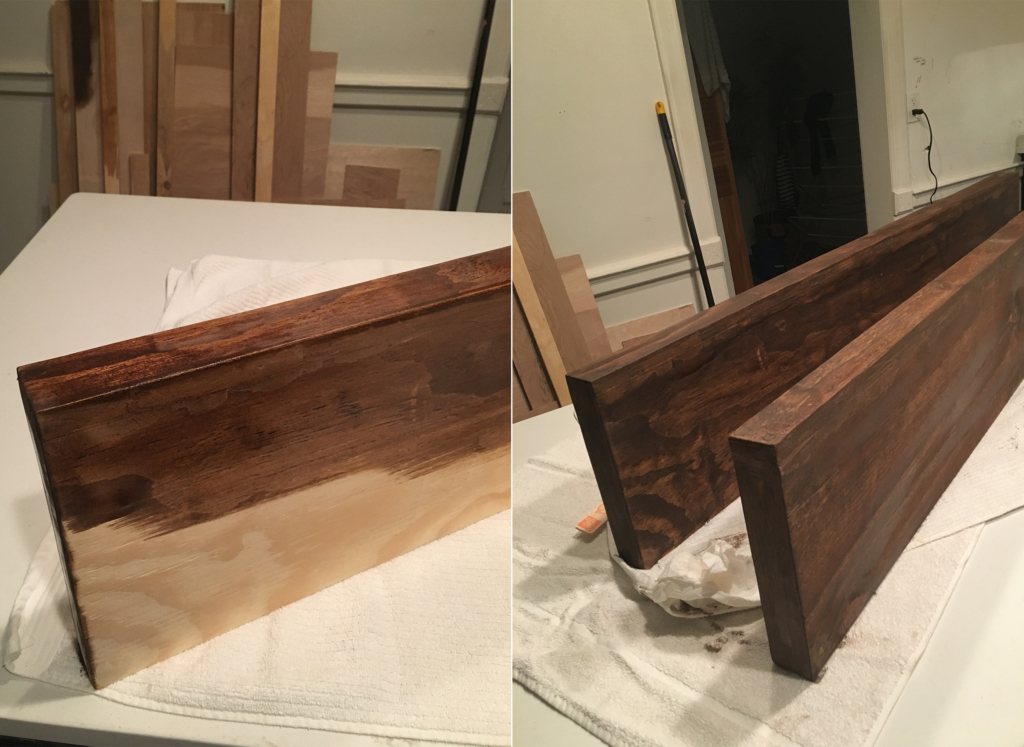
Then stained and sealed.
Then the brackets went in—this was a real character builder. The studs in an old home are not evenly spaced or easy to get into, but with my trusty level and a can-do attitude, I made it happen just in time for the tile installers to arrive the next day.
But wait, the hood cover… let’s rewind quickly for a minute.
I wanted to hide that lonely spaceship hood (which we moved right 1″ to align with range). It needed to anchor that space with a subtle but deliberate presence, so I used A Beautiful Mess’s hood tutorial and drew up a plan to make a hood vent cover to fit my crooked-ceiling-and-walls kitchen (ie: the ceiling left of the hood is at least 1″ lower than the right). That was an interesting cut to make by hand…
You can see the crookedness below right, those 2x2s are level!

It was so helpful being able to draw on the walls…
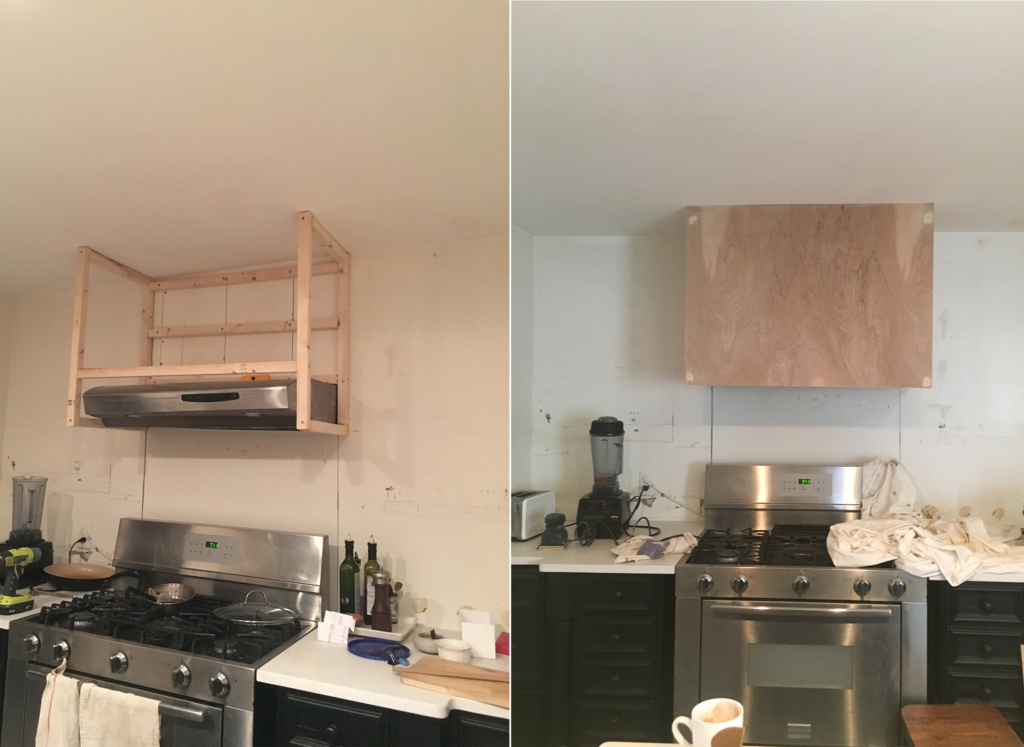
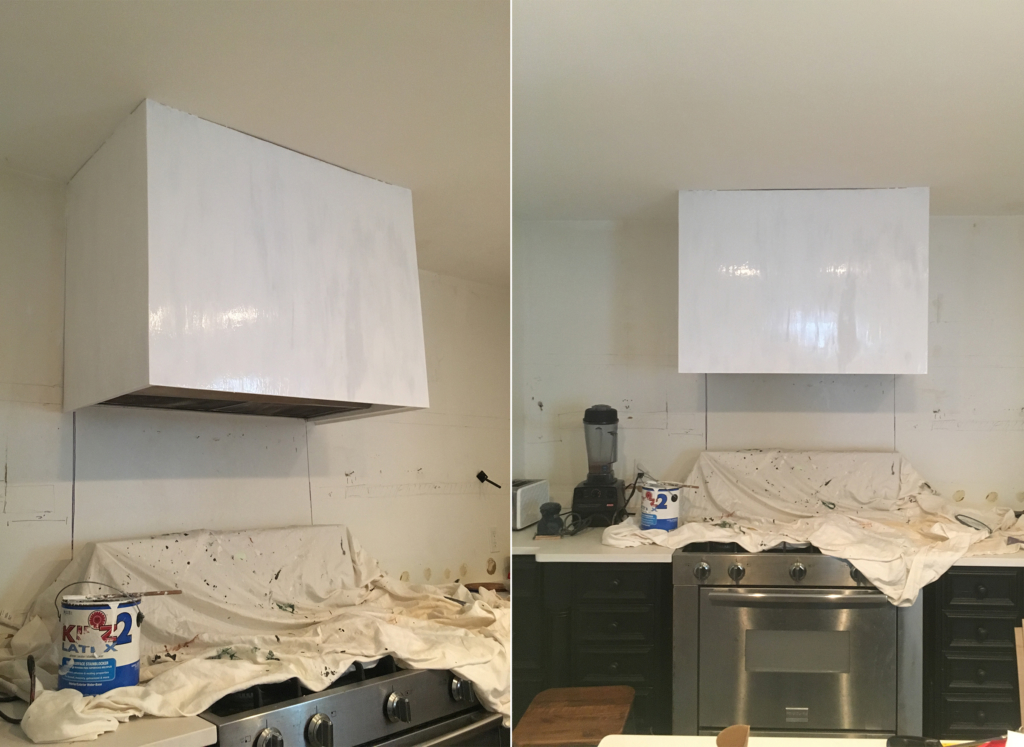
Wood glue and putty helped me create flawless seams, and I used caulk to seal the gaps between the board and the ceiling. Photos below are first coat of paint drying…
Ok, the tile! I wanted the counter-to-ceiling look to create the illusion of more ceiling height—it went in pretty quickly.
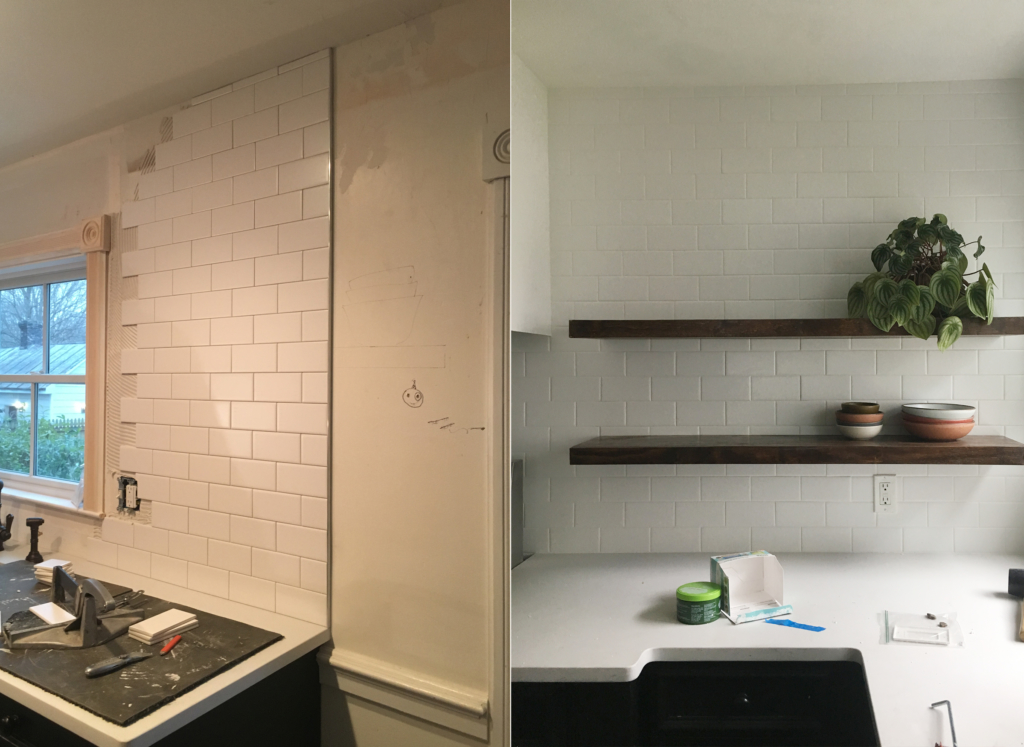
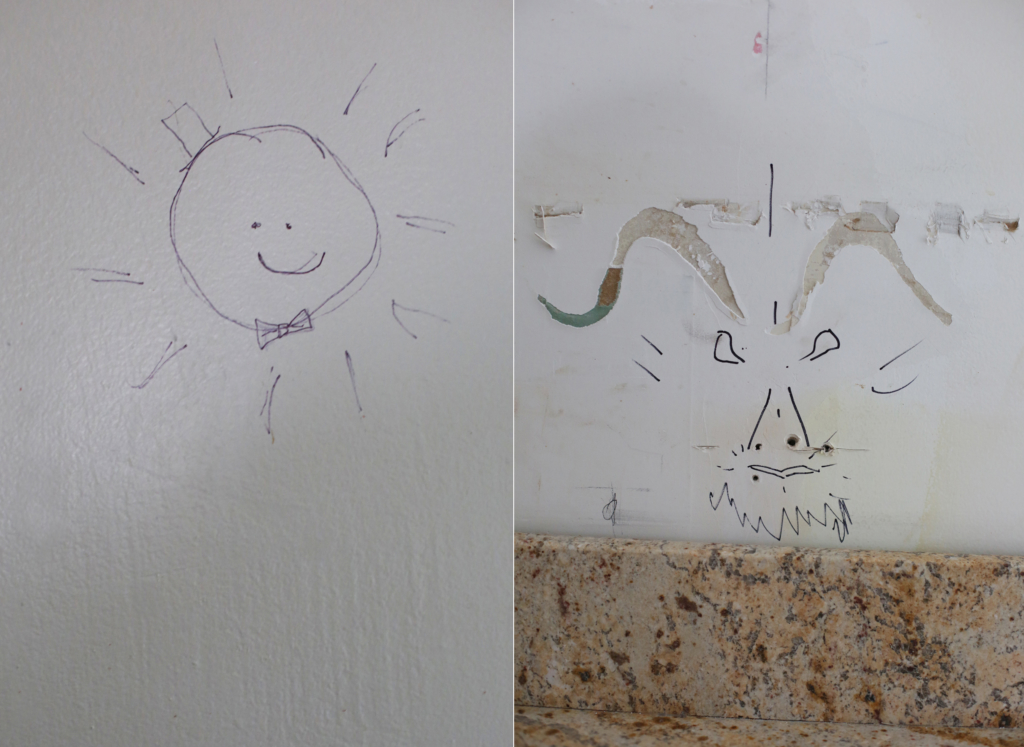
We had to say goodbye to all of the drawings that had accumulated on the walls, but it makes me happy knowing that they are still behind the scenes. Our guardians… my imaginary sun and Mike’s ram!
Once tile was set, I used a mallet to get those shelves in place and with every drive of the mallet was super grateful that the brackets were secure before the tile was in.
After the last pound, I stepped back and stood in silence for about 5 minutes with my jaw hanging open. Slow blinking. It was all done. Three and a half months of work. All on top of design-work projects with deadlines and chaos… launching two courses for GFBA… and some pretty disappointing personal news a few weeks prior…. I did it.
I then thought of my first book. I wrote/created half in a dark, blue, tiny, ship’s-galley-style basement kitchen (during a life-changing move from city to small town) and the rest of the book in another dark, old, mold-prone (but cool) house using one small random skylight upstairs as my only reliable source of natural light. Over 100 recipes prepared downstairs and then carried up a narrow, twisted Civil-War-era staircase and styled under or near that skylight.
Then book two… I remembered how badly I wished I could just cook and shoot Pantry to Plate in a kitchen, but again, every shot had to be transferred and set up elsewhere. How nice it would be to have loads of natural light, to cook on the fly, to simply shoot and share. No photoshopping brightness. No significant editing needed… the stuff of dreams…
I then relished in the absence of the low-grade but persistent anxiety of not knowing where we’ll move to next if our landlords decided to come back from Dallas (a good home is hard to find here, they’re all taken).
I thought of my craving for a space of my own—now satisfied. A space that I could love and nurture for years to come with a yard filled with flowers and plants and foods. I thought of how badly I missed cooking and creating in the kitchen, and how hard I’ve worked on my career(s) and my life. I imagined how great it would feel to have friends from near and far visit, to feed them, take care of them, laugh with them in this home.
This was my kitchen. I made most of it happen with my bare hands and the rest from working my a** off. I could feel the power of all the exciting things that will come out of it these next few years.
I let it all wash over me with a long deliberate breath. A proud nod. There it is.
Then… I had to hustle.
Renovation wrapped up on the morning of a get together I was hosting that evening.
Had to get cooking…

The holidays were a blur. Then we were away for almost two weeks…
But today, my birthday, all I wanted to do was share this post, because I’m so excited for the year to come. I did plenty of celebrating the past few weeks, and this morning I just wanted to make some tea, grab my camera, and celebrate the new power space I made.
Come on in…

This faucet and black sink almost know that they can be seen now…
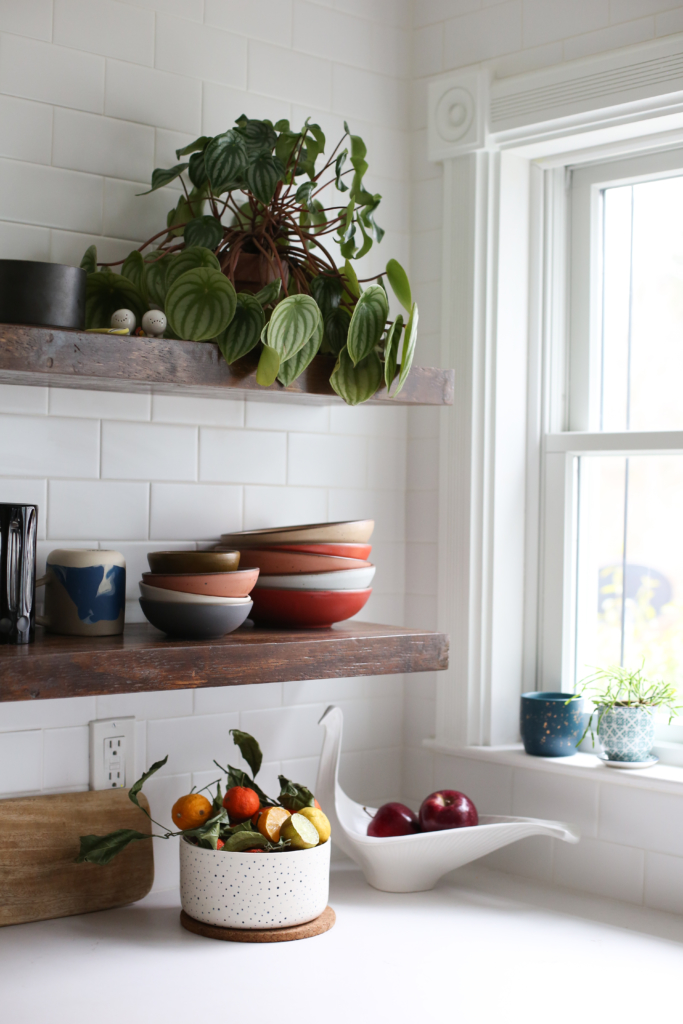
The wood and my most-used and favorite things add necessary warmth to the tiles and the tuxedo color scheme elsewhere.
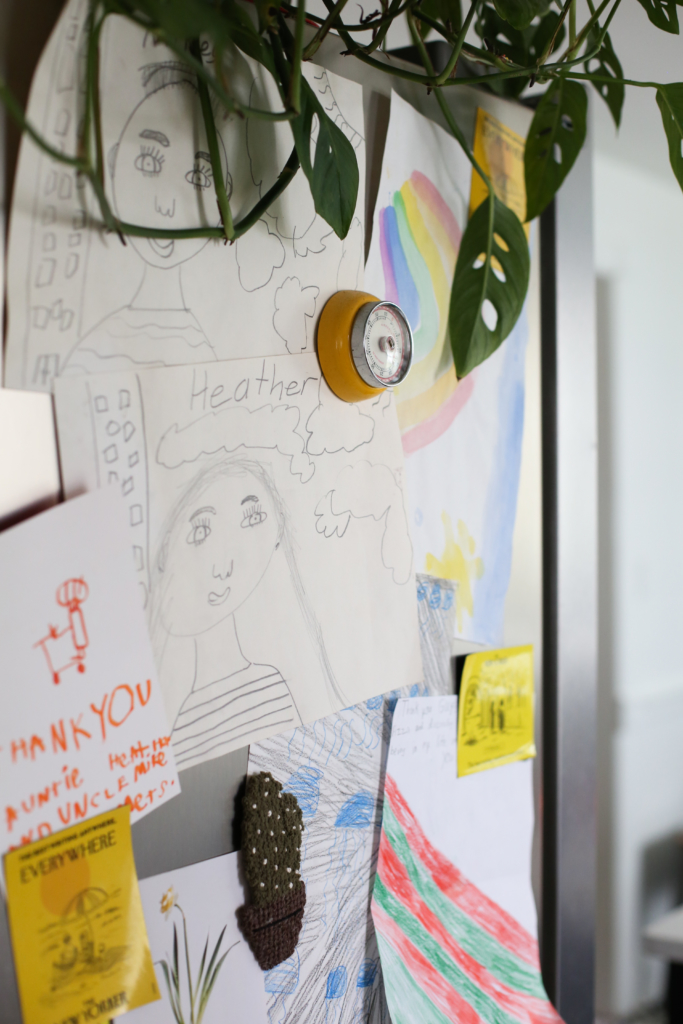
It’s important for me to see the things that bring me joy—things I’ve collected or have been gifted to me by loved ones. Everything has a memory… trip to Mexico, gifts from Mexico, that time Marta and I bought twin spoons in Pilsen, a spoon from Yan Yan, my friend Alex’s rooster…
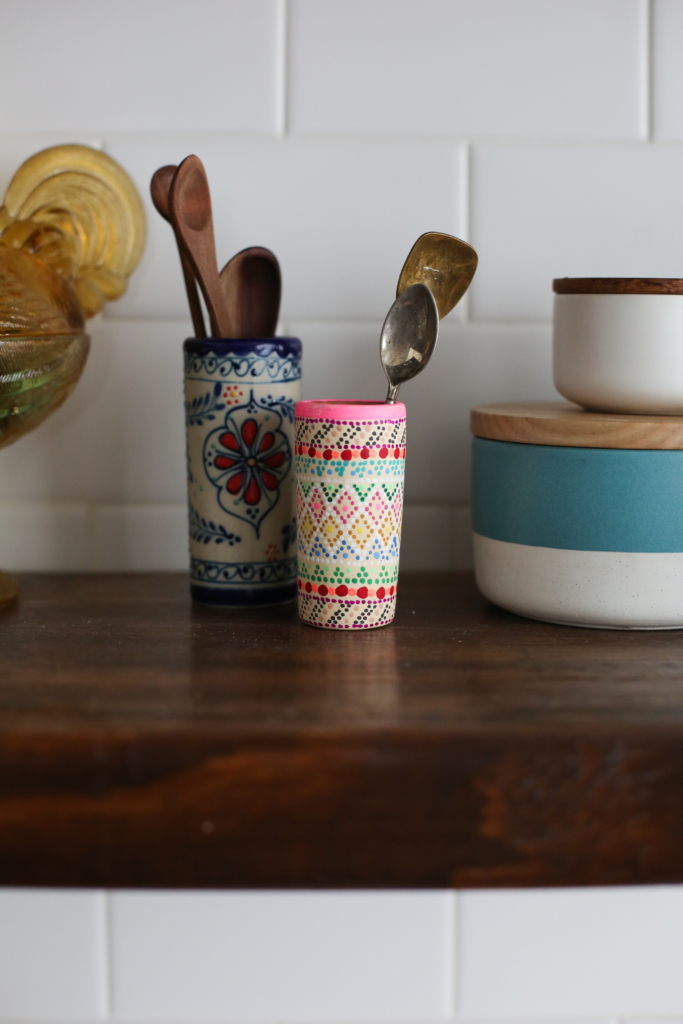
New and old together… mug from sweet Ashlae, vintage glasses from the most talented Angela…
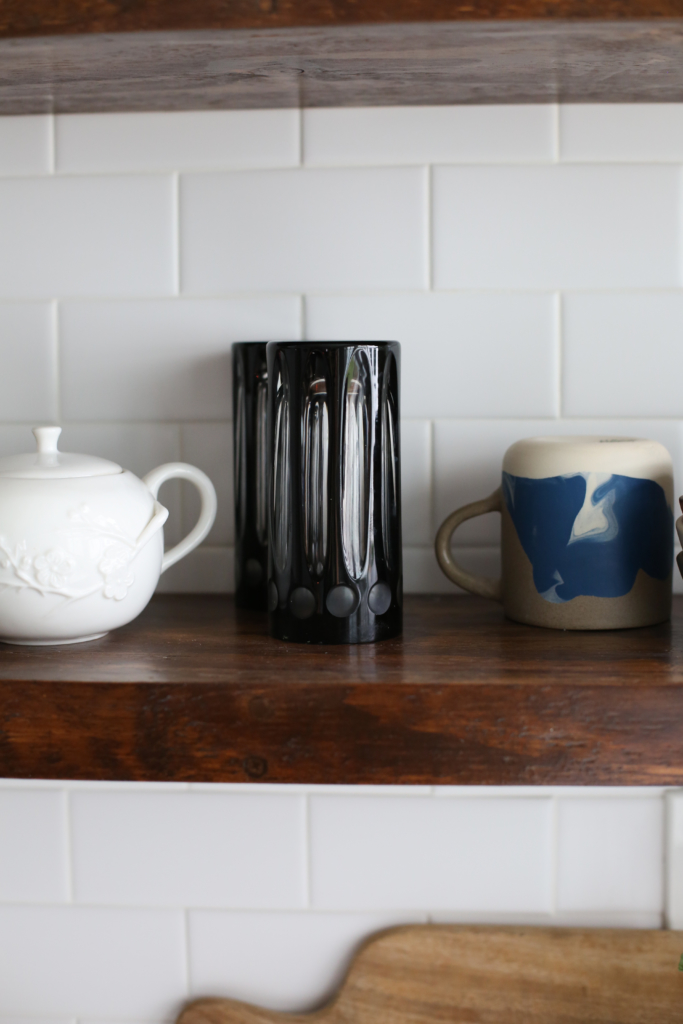
Little friends tucked in the wilderness thanks to cousin Molly… a ceramic spoon from a trip to Australia…

A much lighter, understated presence that allows the color to come from the foods—more inspiration for cooking!
Inviting…
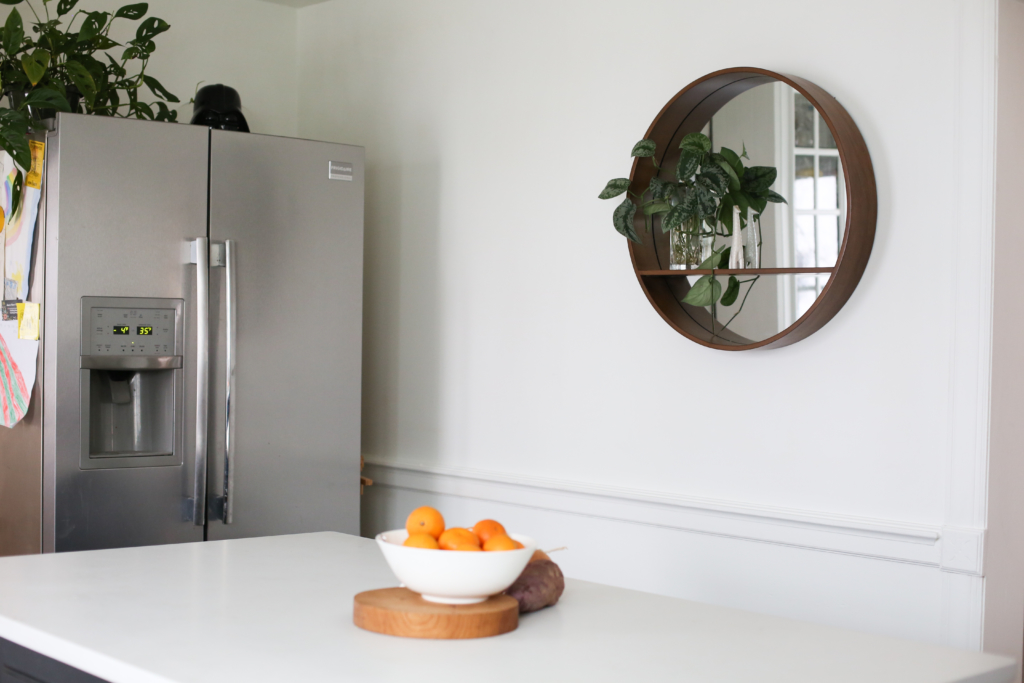
To bounce more light, add more warmth and balance hard edges, a round wooden mirror…
Our nieces and nephews are helping infuse warmth too…
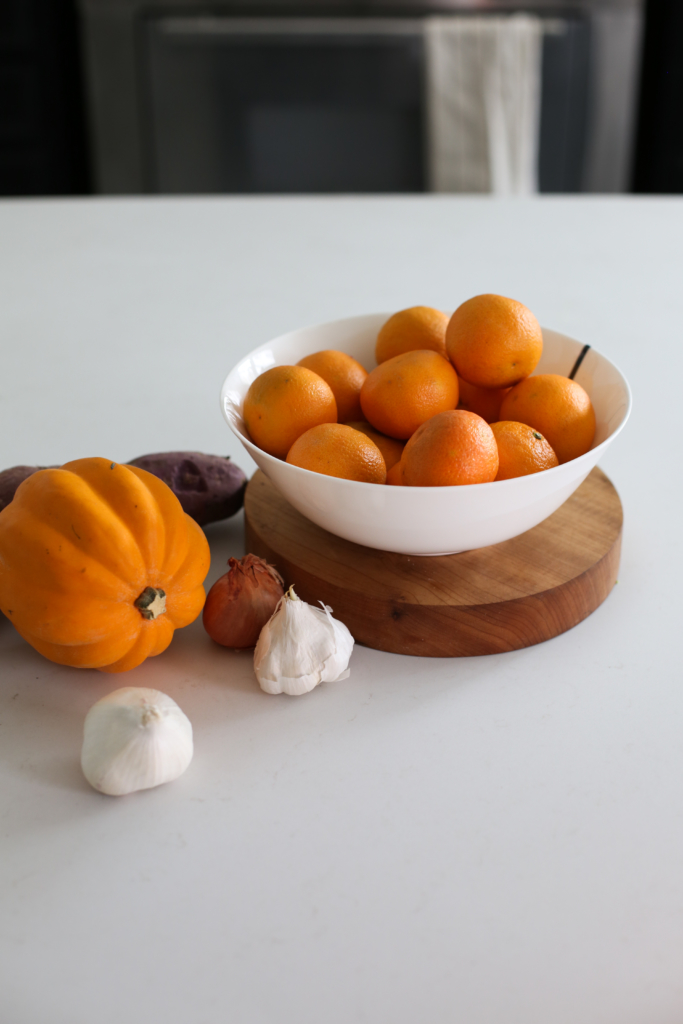
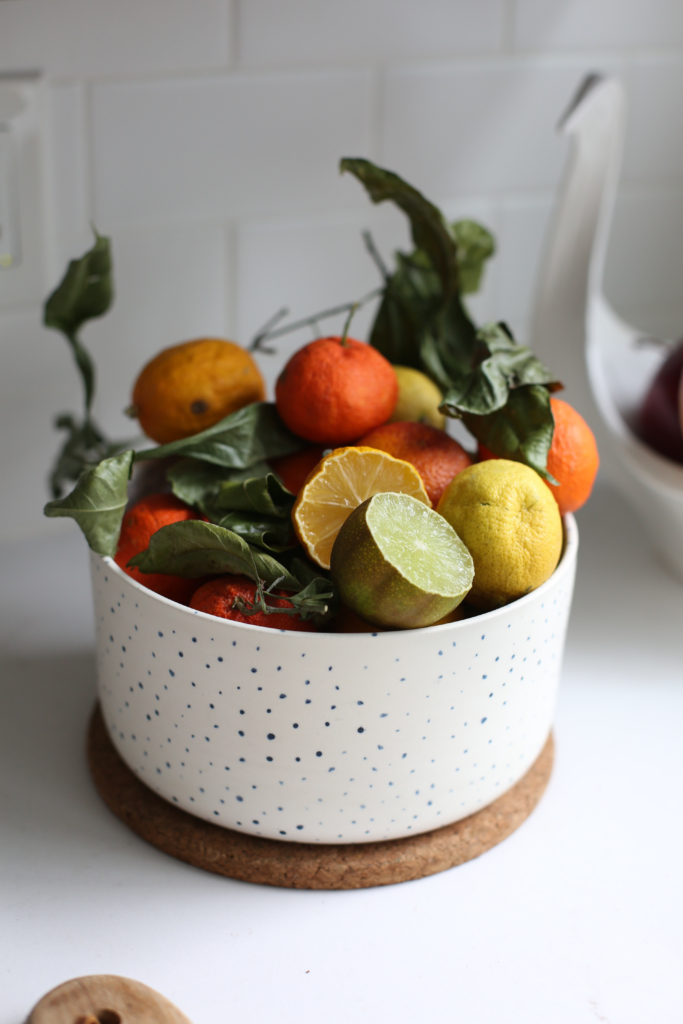
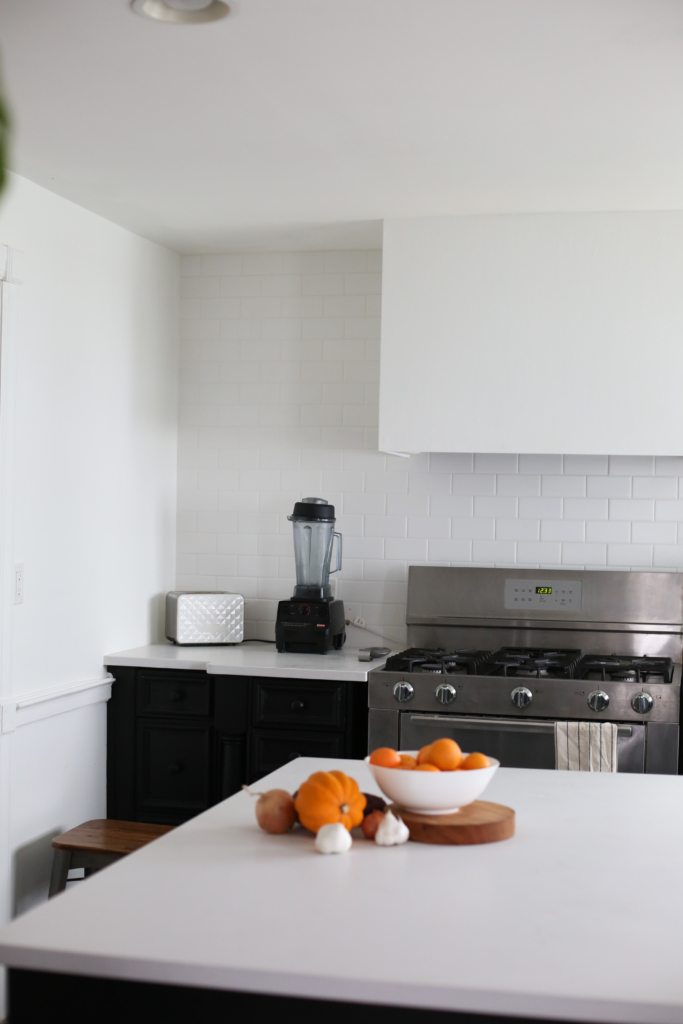
Lots of orange in here today…
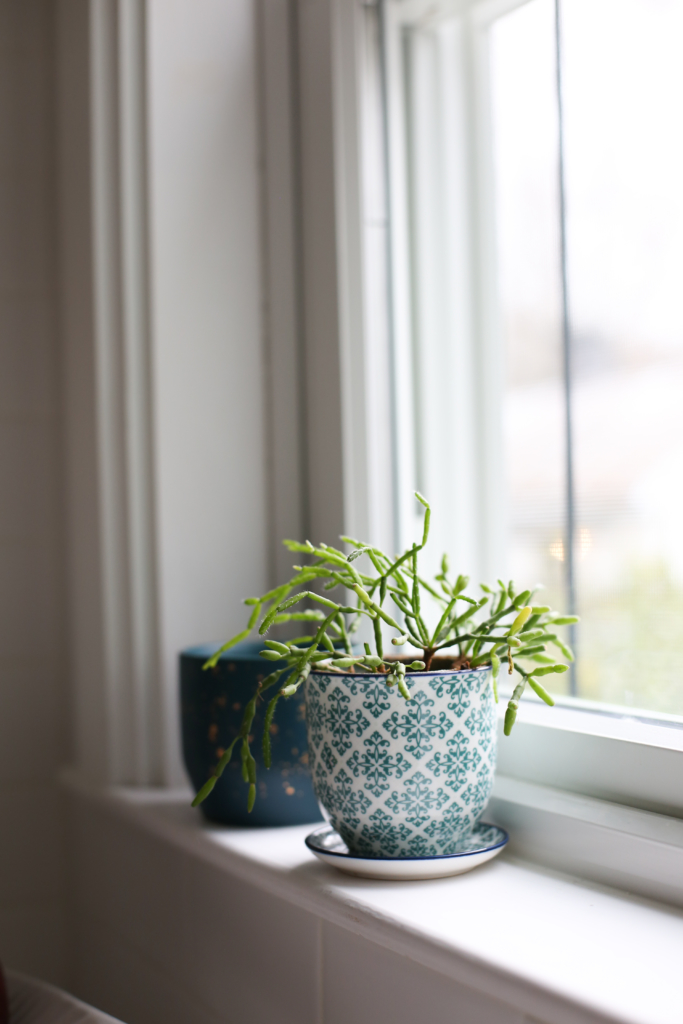
Always with the plant friends…
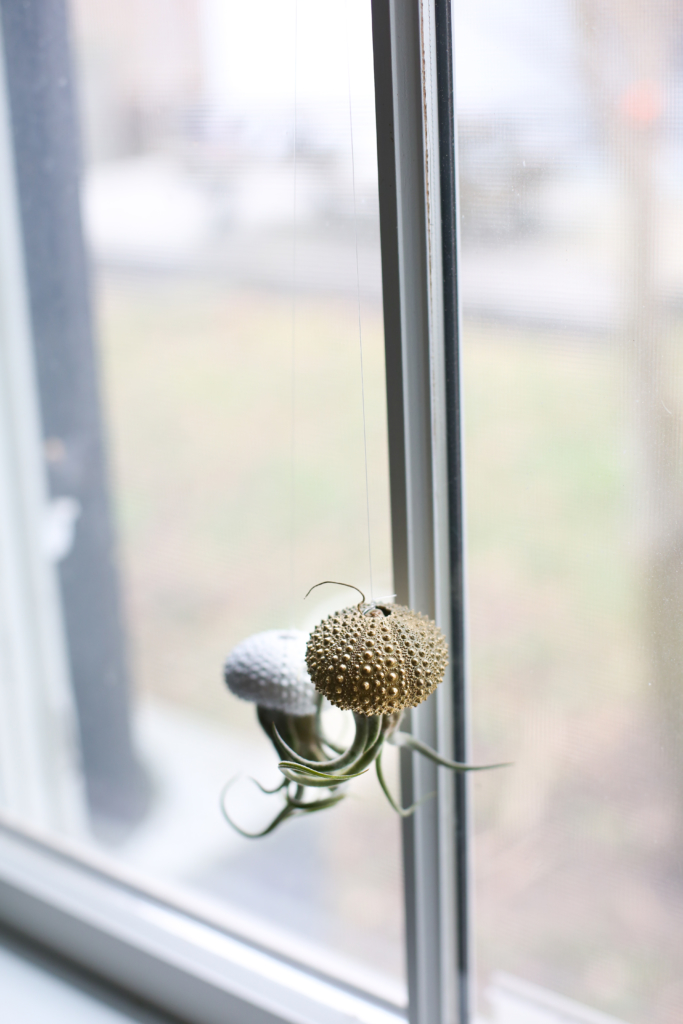
They make the air better though, right? I don’t have a problem… really…
I bought this bowl for citrus years ago and when I did, I told myself that I would have a kitchen someday that would allow it to shine. This citrus withered while we were away on vacation, but it’s still usable, and so pretty… lots of juice this week…
OK. I need your opinion! I want to hang a produce basket for root veggies and alliums. Should it go here in this corner?
Or here above the dishrack?
Random: This stool and I bonded bigtime—it was there as I chiseled, pried, built, painted, sanded, leveled, and hammered. It gave me height and support when I needed it and it’s forever part of the kitchen now, too… I love its battle scars.
Somebody pinch me…
Visit us at our new home: Good Food Cooking School

We sure do Love you, Sweetie. Happy! Happy! Happy!
xoxo
happy birthday! i love your new kitchen.
Congratulations you guys!!!! It’s so beautiful. :)))) and happy belated b-day.