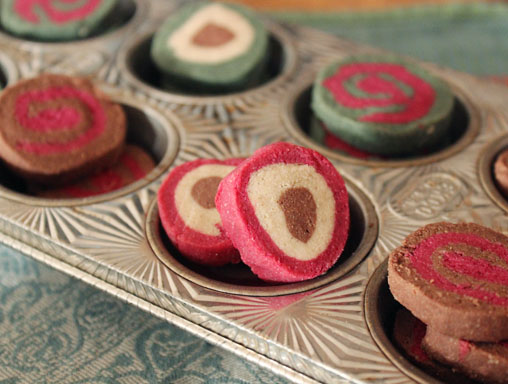
Colorful cookies are just part of the holidays, and for folks who want to steer clear of the dangers of artificial dyes, this Gluten-Free & Naturally Dyed Holiday Shortbread Cookie recipe is for YU. I use cocoa powder for brown, liquid chlorophyll for green and fresh beet juice for red. You can prepare these cookies either with organic powdered sugar (brightest color) or with a less processed alternative, sucanat (more rustic looking).
I will be honest, if you are new to baking, you may want to try simpler recipes like Toasted Pumpkin Seed Florentines, Ginger Molasses Cookies, Chocolate Chunk Puddle Cookies or Oatmeal Chocolate Chip Cookies for the holidays. If you have a lot of patience and baking experience, try these shortbread cookies—you can play around with making swirly styles, or you can keep it simple and use cute cookie cutters. I show you how to do it all after the jump…
Tools:
Juicer (if wanting to make red coloring)
Sifter
Sharp Chef’s knife
Large glass bowl
4 medium glass bowls
Rolling pin or large, smooth, sturdy glass
Unbleached parchment paper
2 baking sheets
Cookie cutters in fun shapes (optional)
Ingredients:
Try to buy everything organic. Here’s why.
Cookie Dough for All
1 1/4 cup gluten-free oat flour (can sub sweet sorghum flour)
1 1/4 cup brown rice flour
3/4 cup powdered/Confectioner’s sugar
1/2 cup unrefined virgin coconut oil, softened to room temp or warmer
1 tsp vanilla extract
1 tsp arrowroot
3/4 tsp fine ground sea salt
Naturally Beet Dyed Red Cookies
2 tbsp fresh beet juice (1 small beet)
1 tbsp oat flour
Naturally Dyed Green Cookies
1 tbsp liquid chlorophyll (you can find it in the supplements section at most health food stores—drink 2 tsp in 8 oz. water daily, it’s a powerful detoxifier)
1 tbsp oat flour
Naturally Dyed Brown Cookies
2 tbsp cocoa powder (you can use cacao powder)
White Cookies
1 tbsp oat flour (optional)
*If you are using sucanat instead of powdered sugar and you have a coffee grinder, run your sucanat through the grinder until you get a powder for a smooth texture. If you don’t have a coffee grinder, your cookies will have some crunch, but they are still scrumptious (my tastebuds actually prefer the sucanat version). Use 3/4 cup sucanat in place of powdered sugar and prepare the recipe as you see above.
Let’s get started.
Sift together all of the dry ingredients called for under the “Cookie Dough” list above.

Like fluffy piles of snow [smile].

Now, in a small bowl, fold together coconut oil and vanilla extract.

Fold into dough and with your hands, mix well and roll into four equal sized balls. Set aside.
Juice your beet. If you don’t have a juicer, you can blend your beet in a high powered blender and squeeze the pulp through a cheesecloth to get some fresh juice. If you live near a shop that sells fresh juices and smoothies, call and see if they have beet juice, or if they will juice a beet for you if you bring one in.

Beet juice amazes me every time—it is so pretty. Mother Nature is a genius.

Now, take one of your balls of dough and place it in a medium bowl and add 1 tbsp oat flour and 2 tbsp beet juice. Using your hands (its the best way), start folding the dough to mix in your natural dye. It may be sticky at first but keep going, the dough will absorb the juice. Roll into a ball and set aside. Let’s move on to green…

… you may remember our friend chlorophyll from the Halloween Witch Fingers post. It makes the handsomest evergreen dye. Just grab another ball of dough and place it in a bowl with 1 tbsp chlorophyll and 1 tbsp oat flour and get in there with your hands until it is thoroughly mixed and roll a beautiful ball and set aside.

For cocoa dough, just work in 2 tbsp cocoa powder. If any dough is way too sticky to work with, dust in a little brown rice flour or oat flour until you reach a rollable consistency—not too dry. But give it time first, the dough absorbs the liquids as you work.
Awww, look at these naturally dyed beauties.

My favorite tip for rolling cookies:
Make unbleached parchment your BFF—I can’t imagine rolling out dough without it.
Lay out a sheet of unbleached parchment (put a drop or two of water between it and the counter top if it wants to slip) and place your dough on top. Then place another sheet of parchment on top of your dough and roll out. Peeling back the parchment reveals smooth dough—it is a great way to ease dough rolling frustration and keeps things a bit cleaner. Check out this Pot Pie post for pics of these steps.
For swirled Cookies:
Rollout and shape two equal-sized rectangles and place one on top of the other and roll on up into a log.
What is cool about these cookies is that the properties of each “dye” mixed with the dough, results in a slight texture difference in the dough. This is where patience comes in. The red dough, and the green dough may want to crack a bit when you are working with it—don’t fret. I prepared this recipe about 5x last week and always had the same results. When making rolled cookies, keep the red or green as the center and make white or brown the outside layer, or once your “cookie log” is rolled up, just continue to gently roll the outside over on itself until the seams come together…

… use your fingers to work any particularly pesky crack by gently pressing and then rolling. Smile, whistle and roll. Smile, whistle and roll. Breathe. You are using real food ingredients and they don’t have the allergen gluten, or the science lab gums and chemical weirdness to make them flawless—appreciate this fact instead of becoming frustrated.
Place rolled dough in the fridge to chill a bit (10-15 mins) for easy slicing.
For circle cookies:
Roll up a 4″ length of dough about 1/2″ in diameter (brown below). Then roll out a rectangle of dough in another color the same 4″ length, and long enough to completely cover that first piece (white below). Repeat with one or two more colors until you get the cookie log size you want. Place in the fridge to chill for about 10-15 minutes for easy slicing.

Intimidated? Don’t be. You can always just roll out the dough out simply, in all it’s one-color glory, and use a cute cookie cutter instead.

Another tip:
Since we are sans gluten (without “glue”) in this recipe, it helps to use your freezer to firm up shapes so you can easily transfer them to baking sheets. I tend to roll out dough, cut some cookies, and if I find that they are too soft and sticky and may lose their shape, I slide my parchment (which they should be on from rolling) onto a baking sheet and pop ’em in the freezer for 2 minutes. The coconut oil is so sensitive to temperature changes that it firms up quickly. Then you can easily use a butter knife or offset spatula (my fave) to slide under rolled dough and lift out shapes, to place them on the baking sheet (see the stars below, how the corners are lifted a bit? They are fresh from the freezer. Once they bake, those corners will come down flat).

Once your swirly cookie logs are chilled, remove from freezer. You want them at just the right temp—not so cool that they crumble apart, and not so warm that they smush. So, test a slice at the end. If it’s crumbling, wait a bit for it to thaw more, until you can easily slice firm cookie shapes with a sharp knife. If it’s too smushy, put it back in the fridge. These cookies do not spread or “grow” when baking, so slice them about 1/4″ thick.

Have fun with any color combination you like.

To bake, preheat oven to 350°F. Bake cookies for 10 minutes, no longer.

Remove from oven and allow to cool on the baking sheet.

These guys were made using sucanat—you can see the difference in color here. A tad less vibrant, but they are delicious this way, too.

You can store in the pantry or in the fridge in an airtight glass container for up to two weeks if they don’t get gobbled up first.
Enjoy!
Visit us at our new home: Good Food Cooking School
