Chocolate Crunch Bars

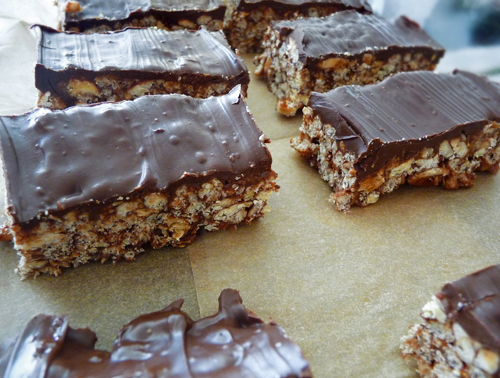
My love is crazy for KitKat bars. I get it—that chocolate, that crunch, that childhood nostalgia—it’s a powerful combo. As my official taste-tester of all things edible in my household, it brings me great joy when I get the happy mouthful of feedback like “mmmwowwww, thwwwis is wwwwreawy ggwwwreat” instead of the deflating “this tastes vegan.” Well folks, these Chocolate Crunch Bars passed the test, receiving one of the greatest reviews yet—the whole tray gone in less than one day.

The salted, toasted almonds, gluten-free oats and sunflower seeds combine with melted vegan chocolate chips for a more naturally sweetened, wholesome treat than a highly-processed candy bar.

There are a few ways to make these. I often adjust this recipe, leaving out the chocolate topping, for a lighter energy bar. Try adding Spirulina Crystal Flakes for micronutrients if that’s your thing, and/or some shredded coconut. You diehard chocoholics could try cutting your bars up and dipping them almost entirely in melted chocolate. Just let them cool in the fridge on parchment paper once dipped. Have fun with it.

I have to say that Heidi Swanson planted the seed for this creation a few months ago. Her beautifully-photographed recipe book Super Natural Cooking has a tasty treat in there that uses crispy rice and brown rice syrup. Genius.

Makes: approx. 12-24 bars depending on size you like to make | Preparation Time: 35mins

Tools:
Food Processor
Double Boiler (optional, just use creativity otherwise)

Ingredients:
1 cup raw almonds
2/3 cup raw sunflower seeds
1/3 cup rolled oats (be sure to purchase gluten-free if you have a sensitivity)
1 cup organic brown rice syrup
1/4 tsp organic vanilla extract
2/3 cup unsalted raw almond butter
2 cups of organic brown rice crisps cereal (be sure to purchase gluten-free if you have a sensitivity)
1 bag of chocolate chips (dairy-free or vegan if you have sensitivities or aversions to dairy)
1/2 tsp pink Himalayan or Celtic sea salt
1 Tbsp cold-pressed coconut oil

Let’s Get Started:
First, grease bottom and sides of a medium or large glass casserole dish or brownie pan with coconut oil and set aside.

On a parchment-lined cookie sheet, spread out your sunflower seeds, almonds and oats. Toast them in an oven preheated to 325°F for about 5-7 minutes. Keep an eye on them, you don’t want them to burn, you want them to smell and look toasted.

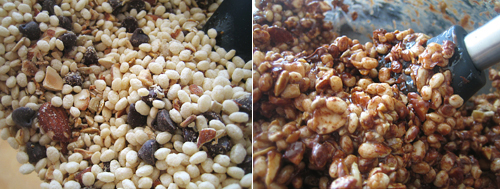
Remove the goodness from the oven and transfer to your food processor. Add salt and pulse until just broken up (bottom, right)—not pulverized into a powder.

Transfer the contents of the food processor to a large glass bowl and add your crisp rice and 1/2 cup of vegan chocolate chips and set aside.

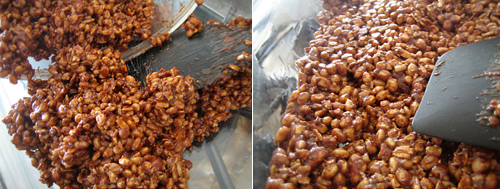
In a medium saucepan, pour in your brown rice syrup, add vanilla extract and 2 Tbsp of almond butter and stir over high heat until mixture starts to boil. Once it has reached a boil, remove from heat and immediately pour into your bowl of rice, nuts, seeds and chips. Mix well until thoroughly coated and chips have melted.

Transfer your mixture to your greased dish and press flat and even.

Now sometimes when I make these, I stop at this point, to keep the bars more simple. But to take them to the next level of decadence (similar to a Snickers bar), do continue reading.

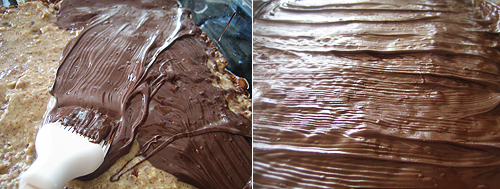
Spread the rest of your almond butter in a nice layer on top of your crispiness (bottom, left) and set aside.

Using a Double Boiler, or what I construct in my kitchen by layering pots, melt your vegan chocolate chips. See bottom, right for my “double boiler.” It’s a large pot filled with boiling water on the stove, with a strainer fixed at its top that then holds a saucepan containing chips. You want the heat/steam from the bottom pot to warm the pot containing the chips. Chocolate is sensitive. If you don’t have a double boiler, whatever you rig up for melting, be very careful not to get any water in your chips, not even a drop, or the chocolate will seize and more than likely be unusable. [What to do if it seizes]

Once melted, spread your chocolate on top of your almond butter layer. I used a silicon kitchen brush here. I’m sure a cupcake icing knife, butter knife or rubber spatula would work well too.

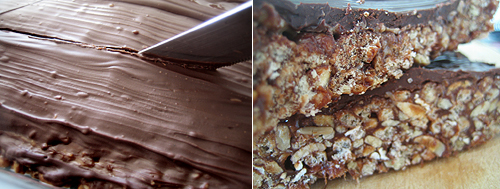
Place your dish in the freezer for about 20 minutes or the refrigerator for about 30-40minutes. Once chocolate is hardened, cut up your bars and enjoy. Individually wrap them in parchment paper and store in an airtight glass container for on-the-go snacks.

Keep Chocolate Crunch Bars in the fridge, on the countertop or in the pantry in an airtight glass container for up to two weeks. Good luck keeping them around that long without eatin’ them up.

I made my bars in a glass container that already comes with a lid, so I can put the lid on and pop it in the fridge or pantry with ease.
 

Soaking and Dehydrating Nuts, Legumes, Grains and Seeds

Nuts, seeds and legumes are packed with healthy fats, protein and minerals, but to get that all good stuff assimilated into your body, it is recommended that you prepare them by soaking them. See, nuts, legumes and seeds contain “anti-nutrients” like phytic acids and enzyme inhibitors to keep them from sprouting until nature delivers the sun and rain that they need to grow. Have you heard people, maybe even yourself, say “nuts or beans are hard on my stomach”? Well, enzyme inhibitors/phytic acids are the reason. By soaking, enzyme inhibitors are neutralized, the beneficial enzymes are activated and the vitamin content increases. Soaking makes seeds, nuts and legumes easier to digest and the nutrients more easily absorbed. Think about it like this, snakes have fangs, porcupines have quills, and plants have anti-nutrients to protect themselves.

Health food stores are starting to stock pre-soaked/sprouted legumes, grains, nuts and seeds, so look for these if you are pressed for time or don’t have a dehydrator.

I discuss using a dehydrator here so you can have ingredients prepared and ready, since a plant-powerful diet is all about accountability and planning.

YumUniverse recipes will usually always call for soaked nuts, seeds, grains and legumes. The only exceptions, are when I call for toasting (which neutralizes some of the enzyme inhibitors) which is a step I recommend for flavor/texture purposes, or if the ingredients do not need to be soaked due to lack of, or very minimal, enzyme inhibitors. Soaking and then dehydrating will ensure that you have prepared ingredients on-hand. I usually take one day a week and prepare all of my ingredients—it’s usually shopping day, or the day after. You can skip soaking, but if you experience gas, bloating or swelling, don’t say I didn’t warn YU.

I also call for soaking for texture purposes for particular recipes. For example, chia seeds becomes like egg white when soaked. Chia is a great substitute for eggs when baking. This unique thickening property also makes a scrumptious gelatin-free pudding.

Cashews, sunflower seeds and other nuts will soften when soaked, which makes them easier to blend into creamy non-dairy sauces and non-dairy milks.

What’s the difference between soaking and sprouting?
YU may have read online all about “soaking” and “sprouting” and your brain is about to melt. Both are extremely beneficial from a nutritional standpoint. (https://vallartainfo.com/)  Let’s clarify the difference between the terms. Soaking is the first step you take when you are going to sprout nuts, seeds, grains and legumes. When sprouting, you continue on past the soaking step, with an easier-than-YU-think-process over the course of a few days, to actually encourage sprouting of your nuts, seeds, grains or legumes.

Learn all about sprouting here and here.

– – –
Want to try out some recipes that use soaked ingredients?

Tools
Dehydrator (optional)
Baking sheet (optional)
Unbleached parchment paper (optional)

Make sure to buy organic ingredients whenever possible. Here’s why.

Recommended Soaking Times
Make sure all nuts are raw before you begin.
plant-based
Almonds*: 8-12 hours
– – –
Cashews*: 2 hours
– – –
Buckwheat: 6-8 hours
– – –
Hazelnuts: 6-8 hours
– – –
Macadamia Nuts: The verdict is out on this one, some say soak, some say don’t. I sometimes choose to soak them for 2-4 hours, but usually skip it.
– – –
Pecans: 6-8 hours
– – –
Pine Nuts: 6-8 hours
– – –
Pumpkin Seeds (a.k.a. Pepitas): 6-8 hours
– – –
Sesame Seeds: The verdict is out on this one too, some say soak, some say don’t. I usually toast them for flavor, but if you choose to soak, 4-6 hours should do. Have a tightly woven strainer available or a cheesecloth to strain without losing your seeds down the drain.
– – –
Sunflower Seeds: 6-8 hours
– – –
Walnuts: 6-8 hours
– – –
Lentils: 8-12 hours
– – –
Green Peas: 12 hours
– – –
Chickpeas/Garbanzo Beans: 12 hours
– – –
Quinoa: 6-8 hours
– – –

Click here to learn more about Soaking and Cooking Legumes

Click here for the Ultimate Non-Dairy Milk Guide

Do not soak
Flax Seeds: become mucilaginous when mixed with water, and are often used as an egg replacer in vegan baking recipes, but flax is very sensitive to heat. The EFAs (essential fatty acids) in flax seed can break down and become toxic when heated, so I personally only use flax in smoothies and cool/cold recipes like salads (low temp dehydrated recipes should be ok). You also need to grind up flax seed (coffee grinder) to assimilate the nutrients—their husk will make them pass right on through your system undigested. Always store flax seed in the fridge or freezer to keep the delicate omegas intact. I use soaked chia seed for baking, because it can stand up to heat, has similar nutritional benefits and the same egg-white like properties.
– – –
Hulled Hemp Seeds: note that these are also sensitive to heat and light, like flax seeds. Best used in salads, smoothies and other cooler temp recipes (low temp dehydrated recipes should be ok).
– – –

Do you like this free resource so far? Then be a doll and share this info with others by clicking here.-based

Recommended Dehydrating Times
Make sure that you fully dehydrate your ingredients so no moisture is left. You don’t want them to mold, you want them tasty and crunchy. 12-24 hours for all nuts, seeds. legumes and grains. Just taste them every 6hrs to see if they are dry and crunchy enough.

You Can Dry Nuts/Seeds in the Oven
Now, they won’t be considered “raw” because the temp will exceed 115° F (and some enzymes will be lost), but you will still get many benefits from oven dried nuts—and if you dry them long enough, they will toast a bit, which always adds great flavor to recipes. Set your oven to the lowest temperature possible. Dry nuts for 30 minutes to 1 hour on a parchment-lined cookie sheet. Remove a nut/seed, cool it and taste. Is it crunchy? Or a bit soft on the middle? If still soft, put back in the oven and repeat this step (checking on nuts/seeds every 20 minutes) until they seem dry. Store in the fridge.

Use this technique for the following:
Almonds
Cashews
Buckwheat
Hazelnuts
Pecans
Pine Nuts
Pumpkin Seeds
Sesame Seeds
Sunflower Seeds
Walnuts

Do not use this technique for:
Hemp Seed
Flax Seed
Macadamia Nuts

This technique also works for preparing pantry storage items like:
Lentils
Peas
Garbanzo Beans
Quinoa

YU can use already soaked and dehydrated nuts and seeds from storage for recipes that call for soaking. 

For grains and legumes, YU can (and will) cook your dehydrated ingredients according to a particular recipe’s instructions.

Let’s soak.
First, if a recipe calls for soaked nuts/seeds/grains/legumes, measure them post-soaking.

Dry nuts usually yield about 1/4 cup to 1/2 cup more when soaked.

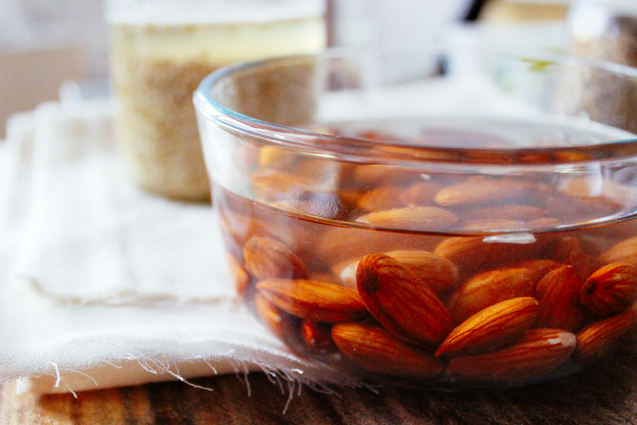
To soak nuts, seeds, legumes and grains, dissolve 1 tsp sea salt in a bowl of 2-3 cups of pure, warm water. Add your ingredients. Make sure there is enough water to cover them about 2 inches. Follow the guidelines above for soaking times. Once soaking time is reached. Toss the soak water (don’t consume this, it contains the enzyme inhibitors that YU are trying to get rid of) and rinse your ingredients well.

Sally Fallon (founding president of the Weston A. Price Foundation) explains that using salt to soak nuts “…helps activate enzymes that de-activate the enzyme inhibitors. For grains, we soak in an acidic solution to get rid of phytic acid. Nuts do not contain much phytic acid but do contain high levels of enzyme inhibitors. The method imitates the way the native peoples in Central America treated their nuts and seeds–by soaking them in seawater and then dehydrating them.”

Soaking seeds and nuts is easy and you don’t need a dehydrator to prepare your nuts for easy digestion. You can store soaked nuts in your refrigerator for 5-7 days until you eat them or use them in a recipe.

To stock your pantry with soaked ingredients, however, you will need to dehydrate them. This requires a dehydrator, which can be purchased online.

Soaking_nuts_dehydrate

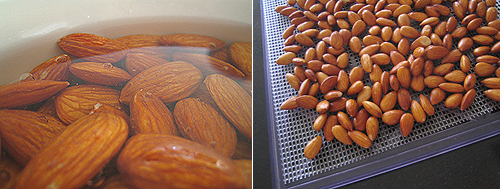
Dehydrate ingredients at a temperature of 95-100°F to maintain beneficial enzymes that enhance digestion and assimilation. I recommend the Excalibur—it’s what I have in my kitchen and I don’t want to imagine life without it. A dehydrator is a key appliance for a raw, vegan and/or health-conscious kitchen. You can make endless treats in a dehydrator like Raw Citrus Spice Cashews for topping salads or eaten alone as snacks, fruit leather, Raw Sweet Potato Chips, even desserts like Raw Cacao Tartlets.

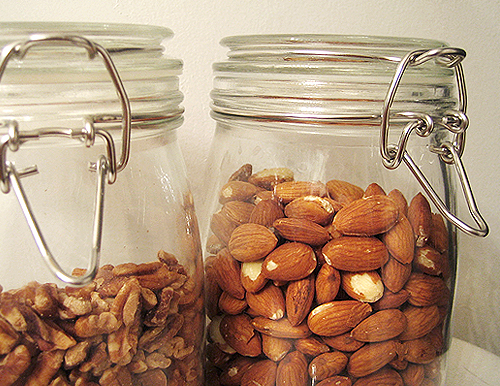
Make your life easier. Soak ingredients in large batches when you return from shopping trips, then dehydrate them and store them in airtight glass jars for when you need them. To maximize space, I use stackable glass jars. Keep your pantry stocked and ready.

Soaking_Nuts_Store

Always in our pantry soaked and dehydrated:
Almonds, pecans, pumpkin seeds, sunflower seeds and walnuts.
These seem to be the go-to nuts.

– – –
*Sadly, U.S.-grown raw almonds are no longer available commercially. Since 2007, all U.S. almonds must be “pasteurized,” meaning fumigated with chemicals—or steamed, if organic. Most times, cashews labeled raw, are unfortunately not since they undergo two separate heatings at harvest. To get truly raw almonds and cashews with all their enzymes and vitamins intact, you must get them directly from the farmer or suppliers like Vivapura.

– – –

References:
1. Smallfootprintfamily.com
2. Sally Fallon, westonaprice.org
3. TheNourishingGourmet.com